The FMS TEL Conference 2022 is now open for booking. With 16 sessions across five days, there’s sure to be something to suit your interests and your timetable.
Sessions will run from 8am-1pm GMT / 4pm-9pm MYT, with sessions running in person in Newcastle, live-streamed, or in online formats.
Timetable at a glance:
Monday: Keynotes, Accessibility, Captions, Canvas, 3D Scanning
Tuesday: Lightning Talks, Augmented Reality and Journal Club
Wednesday: Supporting Labs with Learning Technologies, Microsoft Forms
Thursday: PowerPoint Animations, Making a MOOC
Friday: HTML for Canvas, Lightning Talks, Adaptive Feedback
You can see full details of the session details and book via conference page. Looking forward to seeing you all there!
The FMS Technology Enhanced Learning Conference 2022 will run in the week beginning 7th November. We would like to invite all members of staff – Professional Services, Clinical, Teaching and Research – in FMS and NUMed to showcase their work in teaching and learning, whether this is in the classroom, online, or managing things behind the scenes.
Conference themes include:
Video and Beyond – Virtual and Augmented Reality, Animations, 3D Scanning and Printing
Work Smarter – Improving our workflows, shortcuts, efficiency in processes.
Continuous Professional Development – Developing and implementing CPD
Digital Assessment
Submissions close at the beginning of October. Please check out the Conference Page for full details.
In addition to the FMS TEL Team, confirmed speakers and events include…
Prof Ruth Valentine, Dean of Education, FMS
Dr David Kennedy, Dean of Digital Education
Dr Paul Hubbard, Associate Dean of Academic Affairs, NUMed
If you need to produce captions and a transcript, complete the caption editing first and then use the corrected caption file as your starting point for your transcript. Creating a transcript with the method below will not give you a file that can be used for captions.
When creating a transcript, you will need to decide a few things before you start.
Are timings important, and if so, what level of accuracy do you need? Does every utterance need a time, or would it suffice to signal timing points at the start of each slide, for example?
Is it important to know who is speaking? Training videos may not need this.
The first step is to download your caption file and copy and paste the text into Word. Then, transform your lines of text into a table using ‘convert text to table‘ and setting the number of columns to 4.
Copy your table from Word and paste it into Excel. Once this is done, you can use Excel to trim down your times and make them more human-friendly, using the MID function in a new column. Copy the formula down the whole row to quickly tidy all of the timestamps. This example trims the hours from the start time, and gets rid of the milliseconds and the end time completely.
The formula above (typed into B1) will look in A1 for the source text, and starting with the 4th character, output 5 consecutive characters into the cell, and then stop. You can change the numbers if you need a different segment or more characters, for example, if you want the hours included.
Pasting the resultant data back into Word means you can then use Word’s formatting tools to shape your transcript, adding columns as needed to denote speakers or other important information, and removing columns that contain redundant data.
Cutting and pasting the individual cells containing speakers’ words into a single cell will help improve the look of the document. Paste without formatting to combine the cells into one. Spare rows can then be deleted. Using Find and Replace to get rid of line breaks (search for ^p) and replacing them with spaces further tidies this up. You can then delete the redundant rows.
If you like, you can then remove the borders from your table. You could also set a bottom cell margin to automatically space out each row.
It is important to check your resulting transcript’s accessibility. As this method uses a table, make sure that a screen reader can read it in the correct order. You can do this by clicking into the first cell of your table and then pressing the tab key to move between cells – this is the order most screen readers will relay the text, so check it makes sense.
You can also choose to add a header row to your table to give each column a title. After adding this, highlight the row, click ‘table properties‘ and in ‘row‘ select ‘repeat as header row’. Ally in Canvas will not give a 100% score without this.
Once your transcript is formatted correctly, you can correct your text and fix mistakes in the usual way if you have not already done so for captions. The previous post on Faster Captioning has some tips and tricks to speed this up.
We are delighted to announce that the FMS TEL Conference will run again this year in the week beginning 7th November 2022!
The conference team are in the process of putting together an exciting programme with something for everyone, whatever your role in FMS or NUMed. Colleagues in FMS and NUMed will receive further information by email in due course, and all colleagues are welcome to attend.
We recently delivered a quick Canvas Booster session for Population Health Sciences Institute, which covered Quizzes, Discussion Boards, Accessibility and H5P. You can find the recording and resources for this session in our Canvas Community.
FMS TEL recently delivered a quick Canvas Booster session for Population Health Sciences Institute, which covered the themes below. You can find the recording for this session in our Canvas Community. Other resources are shared below – you may need to log in to Canvas to access these.
This post details some easy tips and tricks to speed up your caption editing process using Notepad and Word.
This post assumes users are using Panopto (ReCap), therefore Panopto guidance is linked for uploading and downloading caption files. Guidance for other products such as Streams, Vimeo and YouTube can be found on their own sites.
In FMS TEL many team members regularly work with captioning videos – whether these are our own instructional videos or webinars, or student learning materials. Recently a few of us in the team have been talking about how we caption videos – specifically, what processes we use. There are some of us in the team who use the inline caption editor in Panopto, and use speed controls to manage the flow of speech so they can correct as they go. Others prefer to download the caption files and work with them in a separate program.
Both methods have their pros and cons. Working within the online editor is often best for short videos, or those with very few corrections to be made. Sometimes, though, it is easier to manage longer or more error-prone caption files in their own window. This gives more space to see what you’re doing – as long as you can avoid messing up the file structure. You can also use proofing tools in Word to speed things along or cut out repeated mistakes.
The rest of this post details some tips you can try to speed up your own process if not using the online editor.
You may find that for the bulk of the editing you don’t even need to be listening to the video – the errors can sometimes be evident just from text.
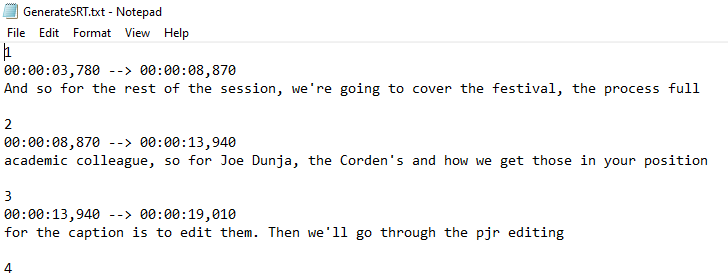
To work with captions outside of Panopto, you’ll first need to download the caption file. If there is no file to download, you’ll need to request automatic captions first. The caption file can be opened in Notepad. From there, you can edit each line of text separately. You must not change the file structure – so do not edit any of the other lines in the file, even the empty ones.
The file repeats in structure every 4 lines. The first is the sequence number of the caption, the second is the timestamp displayed in hours, minutes, seconds and milliseconds, the third is the spoken text and the fourth is an empty line.
If you want to take advantage of some more proofing tools, try copy and pasting your entire file into Word. This will allow you to use tools such as Spelling and Grammar check to remove duplicate words or transcribed stuttering sounds, and can also draw your attention to other oddities. The Spelling and Grammar tool automatically moves you through your document, saving time scrolling and searching. As well as checking spelling, this can also help trim unnecessary words from the text, making it faster to read.
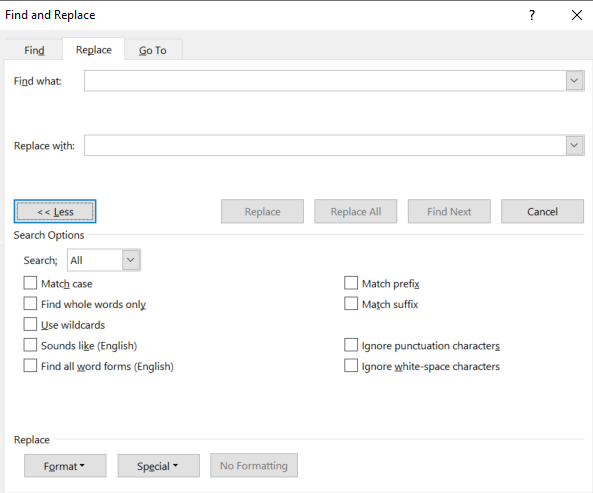
Find and Replace is useful, and can help…
If a name has been consistently misspelled – for example Jo/Joe.
If the speaker has a filler word that can be removed (I say “kind of” as filler so always search for and remove it from the captions!).
To replace key numbers or years that have been spelled out with their numerical representations (e.g. ninety-nine percent -> 99%).
Filtering out inappropriate language if it has been misheard by the auto software – if you see it once you can search the whole document quickly.
Filtering out colloquial spellings (gonna -> going to).
A good tip to ensure you only find whole words is to search them with spaces before and after the word itself. You can also use the ‘more’ option dialog and check the ‘whole words only’ box.
These extra options can help speed things up.
If you have been deleting a lot of items and adding spaces in their place, you might also want to do a find and replace for two spaces together and replace with one space. Run this a few times until there are no results. Similarly, you could look for comma-space-comma if you have removed a lot of filler.
These steps won’t fix everything, but can cut out some of the bulk and help speed up your process. After using these tools, read through the captions carefully again to fix any leftover errors.
When captioning and transcribing, what is meant by ‘accuracy’? When are captions good enough?
In FMS TEL and LTDS many team members regularly work with captioning videos, in particular for our own instructional videos or webinars. Recently a few of us have been talking about how we caption videos and how we decide what to correct. After discovering we all had differences of opinion about what to keep and what to edit, it seemed like a good idea to think through the issues.
This webinar from the University of Kent features Nigel Megitt from the BBC talking about priorities when captioning and audio describing TV programme. It includes research on how people with different levels of hearing feel about captions.
Commercial captioning companies offer a range of levels of detail. We do not outsource these tasks, but the predefined service levels can help clarify what decisions are made when captioning. Is verbatim captioning better than a lightly edited video? An accurate set of captions or transcript should include hesitations and false starts, but a more readable one might remove these for fast comprehensibility and more closely resemble the script of a speech.
Key Considerations
Destination – who is the audience? What do they need?
Speaker(s) – how can they be best represented? How do they feel about you editing their speech for clarity (e.g. removing filler words) vs correcting captions to verbatim?
Timescale – how fast do you need to turn this around? Longer videos and heavier editing takes longer.
Longevity – will this resource be around for a long time and reach a wider audience? If so it may merit extra polish.
Once you have broadly decided on the above, you can deal with the nitty-gritty of deciding what to fix, edit or remove. Deciding on your approach to these common issues means you won’t have to make a decision each time you find an error in your transcript. If working with a few other colleagues on a larger project you might want to agree with each other what standard you are aiming for to create uniformity.
Editing Decisions
The ASR occasionally misunderstands speech and adds incorrect captions that may be distracting, embarrassing or inappropriate, for example adding swearing or discriminatory language that the speaker has not in fact used. Checking the captions for these is a great start, and is likely to be appreciated by all speakers!
We don’t usually speak in the same way we write. Normal speech is full of little quirks that don’t appear in text. Some of these include…
False starts (If we take… no actually let’s start with… yes, OK, if we take question 4 next…)
Hesitations (um….ah…)
Filler Words (you know, like, so…)
Repeated words (You can do this by… by reading the text)
Other Considerations for Captioning
Remember that captions will be read on screen at the pace of the video. This means that anything that you can do to increase readability may be useful for the viewer. This includes simple things like…
Fixing initialisms and acronyms (PGR not p g r, SAgE not sage)
Fixing web and email addresses (abc1@ncl.ac.uk, not A B C One At Newcastle Dot A See Dot UK)
Adding quotation marks around quotes.
You may also consider…
Presenting numbers using figures rather than words (99% not ninety-nine percent)
Removing awkward breaks (When Panopto separates a final word from its sentence.)
Fixing inaccurate punctuation like full stops in the wrong places, or commas and apostrophes (this is quite time consuming).
Considerations for Transcription
As well as the editing and tidying jobs above, before beginning to work with your file, consider whether or not the timing points are going to be important, and how you are going to denote different speakers, or break up the text. For example, for an interview you may need to denote various speakers very clearly. By contrast, for a training webinar, even if there are two presenters it might not be crucial to distinguish them. Instead it might be better to add headings for each slide so that the two resources can be used side by side.
Once you have decided on what to edit and what to ignore, your process will move along much faster as you won’t need to decide on the fly.
Keep an eye on the blog over the next few weeks for tips on how to quickly manage and edit your caption and transcription files.
This post highlights the work done by SDS and FMS TEL to support remote exams over the past few years. Successful techniques for keeping students informed and supported are discussed, including student voice.
This work was also subsequently presented at the Newcastle University Learning and Teaching Conference 2022. Newcastle Staff can view the poster here for an overview.
This work centres on how exams subject to oversight from professional bodies – in this case the General Dental Council – could be run with adequate probity when these could not be undertaken in person.
The first element of this is to run the exams ‘live’ rather than as a 24h format. This meant that teaching staff and professional staff could be on hand to resolve any technical difficulties or make invigilation decisions.
A variety of question designs were also thought through. The final format was a ‘stimulus’ question type on Canvas, allowing an image to be shown with answer options alongside. Now this question type can also be used with Inspera exams.
The support of students with SSPs was also a key consideration, and rest breaks were granted across the board when exams were very lengthy. Students were asked what they thought about the probity measures put in place, such as the use of an exam declaration, and checking responses which may have been copy-pasted. Overall, the response was positive.
A key element in the smooth running of these exams was the preparation offered to students beforehand, such as clear messaging via email and the opportunity to practice with the exam environment before undertaking their summative assessments. 99% of students agreed that they had been well-supported throughout the process and during the exams themselves via the Zoom exam hotline. Most calls were students double-checking their responses had been submitted, rather than having technical issues.
Learning from these exams has already been carried forward for digital exams running through the new Inspera exam system, and the confidence staff and students have in the procedure means that any future changes to circumstances will be much easier to navigate for these teams and cohorts.
Dr Stephanie Holton presented her Unessay assessment task – what could you assess with an Unessay?
At the Learning and Teaching Conference Dr Stephanie Holton, along with two of her students, presented their experiences trialling a new approach to assessment – giving students freedom in how to present their learning, rather than setting a traditional essay task. This work was done in a module examining Ancient Greek texts.
What is an ‘unessay’ – and how exactly does it work? This talk explores the increasingly popular unessay as alternative assessment type, taking as a case study its implementation across several compulsory language modules in the School of History, Classics & Archaeology during 2020-21. Delivered by both the staff and students involved, it highlights the wide range of benefits – as well as the challenges – of diversifying assessment in some of our most traditional modules.
It was fantastic to see how the students were able to approach this new assessment methodology, and the outputs themselves were diverse, including models and digitally-created choose-your-own adventure books. The support provided included workshops and one-to-one sessions so that students knew what to expect, and were confident they were on the right track. While somewhat time-intensive in terms of support, the level of engagement and ownership the students felt around their creations was a clear benefit of this methodology.
Students were able to share their extra curricular creative skills, and the diversity of their approaches meant that they were prompted to explore their texts in new ways – for example researching clothing colours for their model characters that would be appropriate for the time. The need for these extra details prompted students to do more research around their text that they may not have otherwise done, broadening their subject knowledge.
These kinds of assessments open the door to students using and expanding their digital skills, even though this isn’t the focus of the assessment. The element of choice allows them to choose their own level of comfort with how they’d like to present their project – whether this is in a digital format or physical.
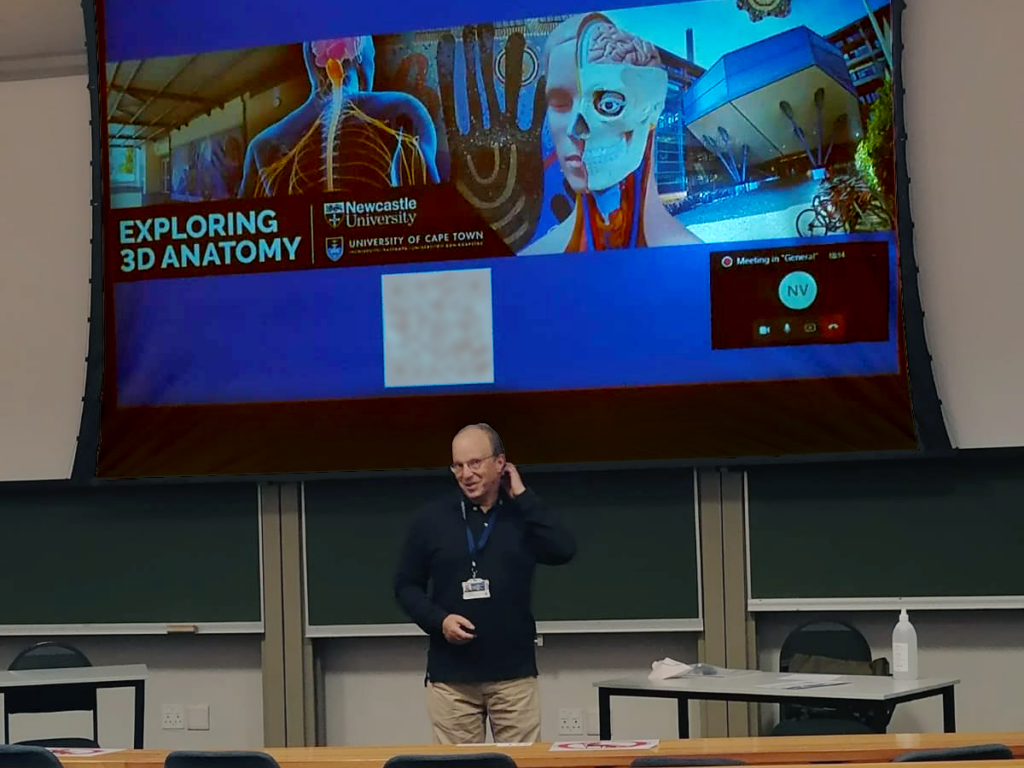
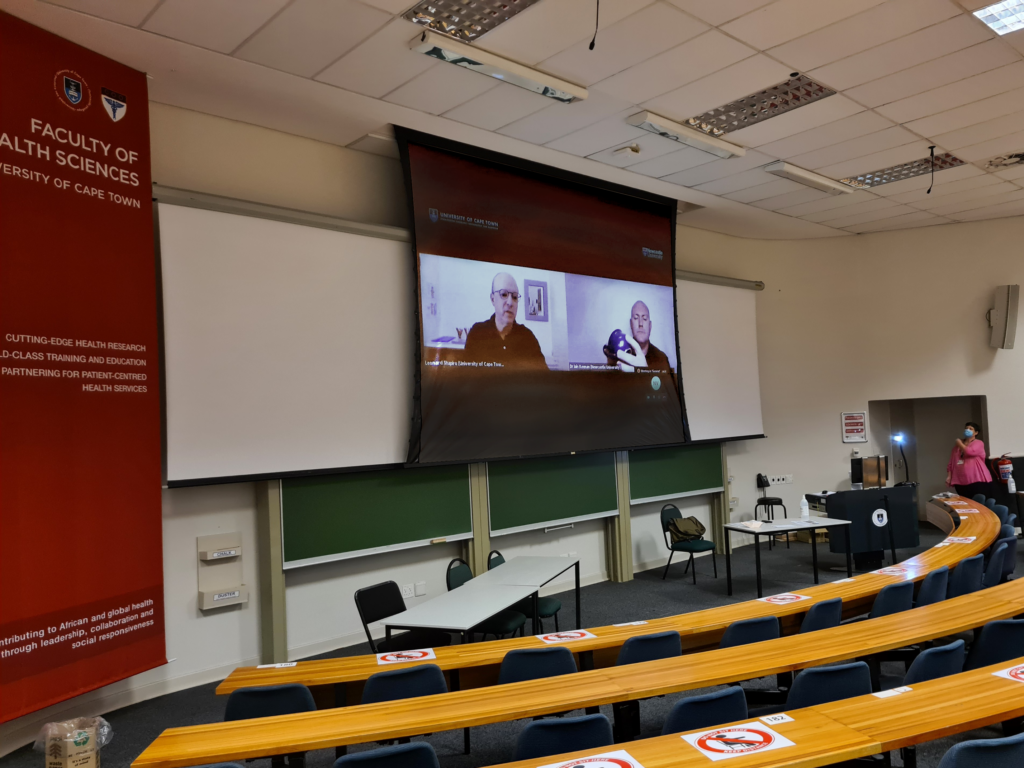
This week students from the University of Cape Town have joined the pilot of the Exploring 3D Anatomy course.
The second pilot of the Exploring 3D Anatomy course is now live, with students participating at the University of Cape Town in South Africa.
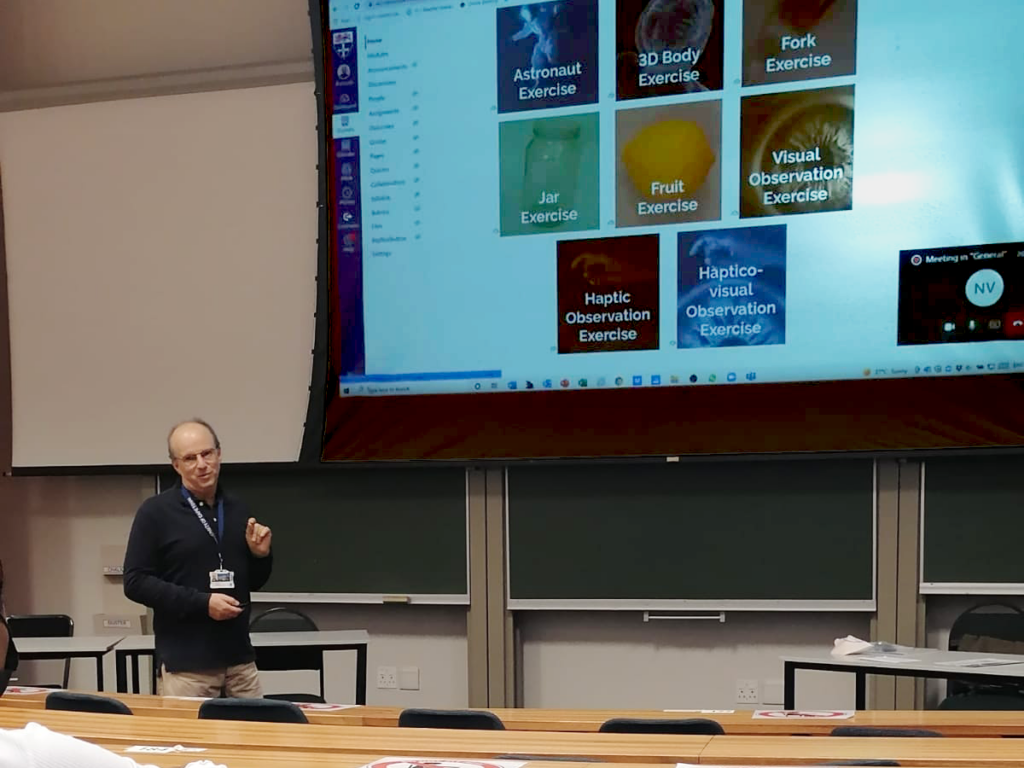
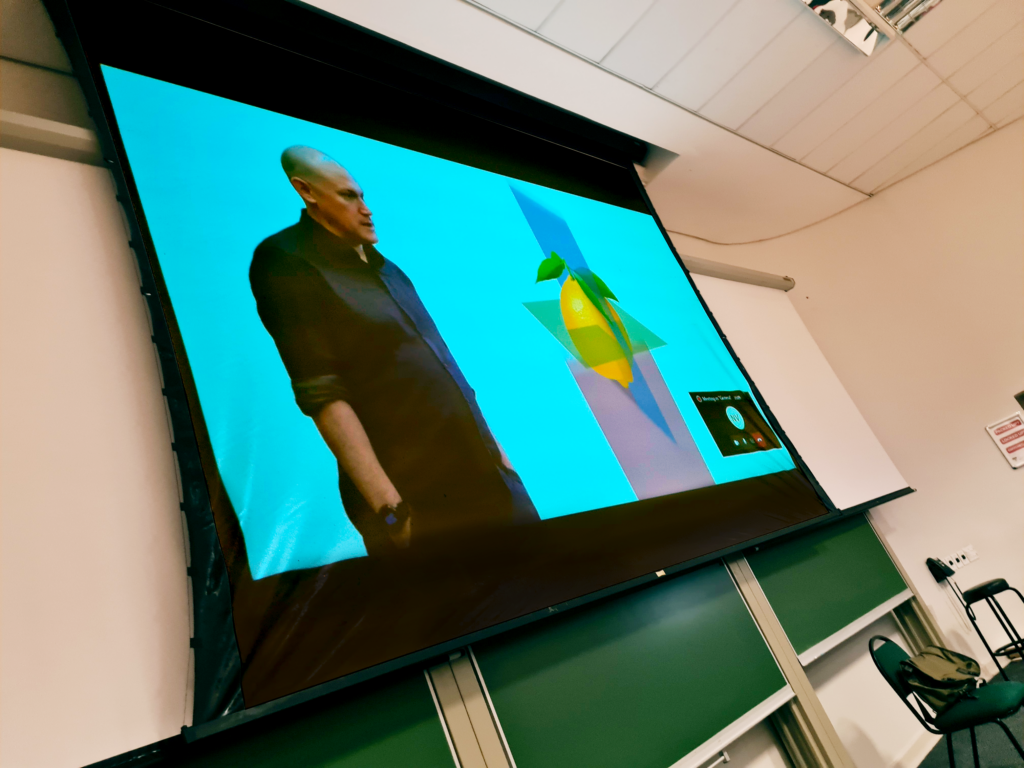
Leonard Shapiro presented an introduction to the course on 18th March to a class of second-year medical students – many of whom joined the class remotely via Teams.
Leonard presents the courseAn example of one of the course exercises is sharedLeonard presents the course exercisesDr Iain Keenan in the course trailer
The course trailer was also shown, and students were invited to sign up using a QR code posted on the slide show as well as on posters in the lecture theatre. Senior lecturer in Anatomy, Dr Geney Gunston, also posted the sign-up link for the students on VULA, the university messaging system.
Many students have signed up, and we look forward to working with them over the next few weeks as they Explore 3D Anatomy from home.
After this pilot and a further development phase, we hope to make the course more widely available to many more students.
Images provided by UCT medical student Mulaudzi God-mother Matodzi-muswa and Leonard Shapiro.