Digital Code for Teaching Anatomy Online – Joanna Matthan

Jo Matthan (Director of Academic Studies, School of Dental Sciences) talks about the teaching of Head and Neck Anatomy (DEN1101) within the School of Dental Sciences (SDS) at the Faculty of Medical Sciences (FMS), and how the move to online teaching necessitated the development of a specialised Digital Code around the use of cadaveric imagery.

Background

In Present-in-Person (PiP) teaching, students attending this foundational head and neck anatomy course would typically have access to the Dissecting Room for their learning. This would be delivered over a six-month period in their first year on either the Dental Surgery (BDS) or the BSc Oral and Dental Health Sciences degrees. This face-to-face time has been reduced to 12 hours from the approximately 50 hours of hands-on anatomy teaching delivered, which left a considerable amount of content to be covered in the digital format. In normal times, a code of conduct is signed by every student the first time they enter the restricted Anatomy and Clinical Skills Centre teaching facility. This was utilised in a digital format during the pandemic but, due to the major overhaul in teaching delivery, there was no way of reinforcing the messages contained within the code of conduct on a regular basis. It felt like a tall order to expect students to remember and understand a list of statements that is seemingly far-removed from them at the start of their anatomy learning journey, and to retain this volume of information in the digital era.

Due to the highly sensitive nature of working with donated cadaveric material and the associated professional standards and ethical considerations linked to this usage, it was necessary to develop a set of guidance to protect the dignity of donors, whilst simultaneously guiding educators, students and institutions on the manifold issues to consider when transitioning to online cadaveric teaching. The sensitive material (i.e., cadaveric images) would not normally be available to students on an ad hoc basis on their own devices. As this content still needed to be covered to ensure the healthcare professionals received all of the necessary training they needed to practice their profession safely and keep patients safe, questions arose around the potential for covert screen-capture, unauthorised viewing and wider sharing of cadaveric content. Such breaches of professionalism have widespread implications, not merely for the course and programme but potentially for the institution. It became clear that it was necessary to collate clear guidance for staff and students to steer through the digital landscape.

Developing an In-house Digital Code

An in-house digital code was developed as part of the SDS Digital Delivery Working Group – a student-staff collaboration that convened over summer 2020 to specifically mitigate for any anticipated issues that could arise from the shift to online delivery for both students and educators within the School. Three different digital codes were created, each in the form of a holding slide that could be utilised in (1) Cadaveric Anatomy Teaching, (2) Clinical Teaching and (3) Seminar or Lecture-based teaching situations. These slides were circulated to the FMS TEL Group and then circulated for feedback from the other Schools that grapple with similar concerns around donor dignity and patient confidentiality. A basic confidentiality agreement was later put in place institutionally, but this was not specific to anatomy or teaching involving potential breaches of patient information. It was felt that, in the new era of digital delivery, it would be more beneficial to reinforce the message of a common digital code at every learning encounter to clearly communicate to students the expectations and behaviours appropriate for this form of teaching. For this purpose, the Digital Code for anatomy was developed, with the aim of utilising it as a holding slide for every synchronous encounter, and as a recorded slide at the start of each non-synchronous session that included cadaveric content.

Digital Code in Practice

The Digital Code slide is displayed at the beginning of every teaching session, whether synchronous or non-synchronous. In synchronous sessions, it is used as the ‘holding slide’ displayed as students enter the video call. When teaching begins, the slide is also reinforced verbally to signal the start of the learning and shared professionalism code of conduct. In practice, it may feel that the points around ethical standards and professionalism are somewhat overemphasised but, given how important they are, the Digital Code does bear repeating. In non-synchronous sessions, a pre-recorded initial slide is added to every lecture recording to reinforce the message not to view the recording in public and to adhere to the digital code. This is added to all recordings from all contributors.

The slide shows 10 dos and don'ts. Do find a quiet place for viewing, switch off from other devices and social media, be mindful many are working from home and disruptions may occur, focus on the session at hand, mute yourself when not speaking and unmute yourself when speaking, raise your hand if you want to ask a question, switch your camera on if possible when speaking. DO NOT view this material/session in a public place, breach confidentiality, take screenshots, use and screen-recording or recording devices to capture these sessions, share material from the sessions, post or discuss sensitive material on social media
The Digital Code slide (download .ppt slide at the end of the post)

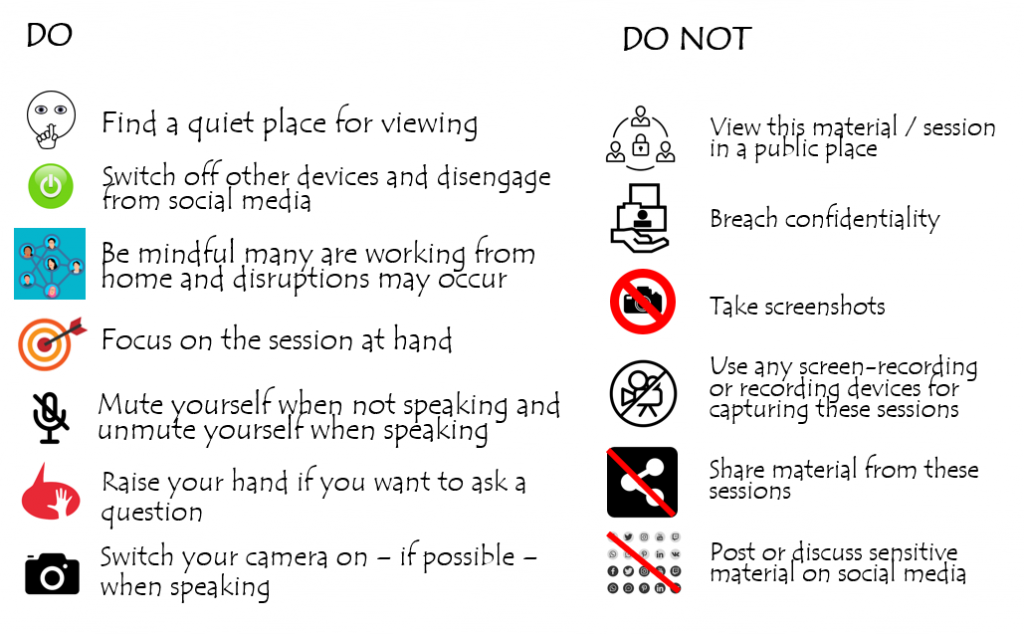
The Digital Code slide gives a simple overview of both the required professional behaviours for healthcare professionals and unacceptable behaviours, bringing the more abstract guidance document into clear actionable focus. As a result, students are very clearly aware of the professional expectations expected of them in their chosen field of study, and these regular reminders serve to reinforce this. This is much more effective than simply citing a document which may have only been seen once at the beginning of the course. The existence of this Code is beneficial not only for students who, it is hoped, develop a sense of responsibility with the access to sensitive content, but also for donors, teachers and institutions who can rely on clear guidance but also appreciate that institutions have pre-defined consequences for any breaches – of which none have been reported thus far. Students have displayed high levels of professional conduct throughout the anatomy teaching in SDS and have adopted the digital code without any apparent reluctance or challenges. It is highly likely that, once students return to physical classrooms, this practice will be continued and developed.

Taking it a step further: Developing National Guidance for Online Cadaveric Imaging

Due to manifold misunderstandings on the legislation and guidance around the use of cadaveric images, it became clear at an informal National Designated Individual (DI) / Head of Anatomy Forum (convened to improve communication during the pandemic and consisting of heads of anatomy units and DIs from across the UK, as well as representatives of the regulatory bodies from each country) that educators could benefit from a unified front with regards to digital cadaveric education. A small group from within this informal forum (consisting of representatives from Brighton Sussex Medical School, Newcastle University and University of Nottingham) collated anecdotal and professional experiences with patient confidentiality and social media guidance documentation and developed a three-pronged approach to using cadaveric content online. The first step was to search for guidance from the relevant professional bodies. The Human Tissue Authority (HTA), the national body who regulate teaching related to cadaveric specimens in England, is virtually silent on the use of images of a cadaveric nature, and decisions relating to how images can be used are made by the local HTA DI within institutions. There is also a paucity of guidance on image usage in this context from the devolved nations’ regulatory bodies/inspectors. Some institutions do have some guidance around social media and images, but there is no unified and unambiguous guidance on cadaveric teaching in the online era.

The draft guidance document was circulated to the DI Forum and to the HTA for comments and the final document amended with suggested changes. The current version, along with a suggested PowerPoint slide, is already utilised at SDS for teaching purposes. It has recently been presented at the March 2021 meeting of the Trans-European Pedagogic Anatomical Research Group (TEPARG), at which it proved very popular across the European countries represented, and has been widely lauded for its clarity and utility during this period of intense change. The guidance document, with the digital code appended to it, is now in use across many institutions nationally and internationally and is being reviewed for formal dissemination.

Resources

Human Tissue Authority

TEPARG – Trans-European Pedagogic Anatomical Research Group

Newcastle University Digital Etiquette Guide

Newcastle University Staff – Join our Canvas Community for access to all resources

Download the Slide and Guidance from our Canvas Community

Webinar – Getting the Most out of Discussion Boards

The FMS TEL team are proud to present our upcoming Webinar – Getting the Most out of Discussion Boards

Thursday 17th June 2021
9am-10am and 1pm-2pm BST

Discussion boards are very difficult to ‘get right’ and trying to encourage and maintain student participation can be a challenge. Students may be reticent to engage initially and it is sometimes difficult to design an exciting discussion task in a non-synchronous teaching environment. This webinar is a practical session which aims to give you tips that you can quickly implement to boost engagement with your discussion boards.

By the end of the session you will: 

  • Have a range of discussion board task ideas to incorporate into your teaching 
  • Understand techniques to encourage student engagement 
  • Be able to set up different types of group discussion tasks 

We look forward to seeing you there. Click below to book a place, or to receive a reminder to access the recorded session and materials when available.

Teaching Document Accessibility

The Faculty of Medical Sciences Digital Skills provides lifelong learning to students throughout the faculty on a bespoke basis. Our tutorials cover the use of Microsoft Office programmes such as Word, Excel, and PowerPoint, as well as tutorials on how to work with specific media such as images and posters.

Recently, we have increased focus on the value of our tutorials by highlighting lifelong learning skills for accessibility. As part of our Word tutelage, we teach students to use Styles to format their documents. Styles are packets of information that control how text looks and behaves. Namely, we teach students to work with heading and caption styles. In addition to being effective and efficient methods of formatting text, styles have an important role to play in accessibility. Screen readers can analyse a Word document using styles and accurately interpret headings. This allows users to easily navigate through documents. And, when converted to a PDF, styles automatically create tags in the document affording the same benefit for screen reader navigation.

Additionally, we teach students how to add alternative text (alt text) to images they insert into Word or PowerPoint. Alt text allows users with impaired visibility to understand what an image depicts. By using alt text, student increase accessibility of their digital documents. And, like styles, when converted to PDF, images retain tags of their alt text.

These skills are truly lifelong learning skills as they provide students with the knowledge and ability to create accessible documents. These skills will serve them in their future careers where digital documents will be required to meet specific accessibility regulations.

Chameleon Programme – Blended Working

The Project Beginning

In September 2019, I started a Chameleon Programme that was tasked with reviewing how the university could support colleagues to work more flexibly. A particularly relevant topic as it turned out!

The Chameleon Programme is a year long business improvement programme that involves colleagues from across the university working together, in multi-functional teams, on specific projects set by Senior Officers Group . I was teamed with three other university colleagues, who work in different areas of the university and with different roles.  Our project sponsor was John Hogan and we had to set about devising plan and understanding our project scope.

We began by gathering information from sources at the forefront of flexible working, such as CIPD and ACAS, as well as reviewing existing university policies . Interviews with various colleagues across the university, such as School and services managers gave us a better understanding of what ​Flexible working meant in the context of our university. Consensus was that there was support for increased flexible working practices but there was a need for greater guidance to ensure fairness . 

We also had the opportunity to visit an external company, called The Thirteen Group, who are a social housing provider located in Middlesbrough.  Their belief is based on staff being in control of their working patterns with productivity measured by outputs rather than presenteeism. They invested heavily in infrastructure and technology as well as providing guiding principles, with endorsement from senior leadership, which was key to driving the changes. ​It had showcased what was possible.

Desk availability system and The Thirteen Group

We decided to try to mirror some of the Thirteen Group principle through an initiative called ‘Flexible Fortnight’ – the principle was to remove existing boundaries to working times and allow teams to manage working hours accordingly, and we were to capture staff response via a survey.

We had a plan.  We had teams ready to take part in the Flexible Fortnight and had generated recommendations that could be put forward and arranging events to present our findings.

Then, it all changed

Then COVID came along! 

COVID has been responsible in changing working patterns, for most employees, across the university; how we work, where we work and when we work. 

In March 2020, everything changed.  The majority of us were asked to work from home.   It was potentially the best Chameleon project ever! Or it might be the worst ever!

What did that mean for our project?  Well, it meant change too.  We could no longer pursue the initiatives that we had arranged.  So, we created a questionnaire to incorporate feedback about working for home.  We combined the survey results with the findings from our research and submitted a report in June 2020 to our sponsor.  We were also invited to be part of some of the Executive Board lunch meetings that touched on the new way of remote working and listened to feedback from staff across the wider University.    

Its flexible; its informal; its team specific; its build on trust.

This culminated, in December 2020, with an invitation to join a task and finishing group for blended working. The group includes representation from the Faculties, People Services, NUIT, Estates and Trade Unions with the focus on discussing how the university workforce could mix campus-based working and working remotely, post pandemic. Consultations are still ongoing, papers have been submitted to various committees, and webinars have been arranged to give colleagues the opportunity to hear plans first hand. Hopefully, this will be the start of clearer vision going forward.

The Future of working patterns

What have we learnt? A lot! One thing is certain, there is a consensus that we do not want to go back to the way we operated before. Why would we look back when we have come so far? Though the past year has been challenging on many different levels, it has also allowed many of us to gain first-hand experience of working in more flexible ways. There is an opportunity to embrace change from the lessons learnt and build a more modern approach to our working culture and behaviours. To make a change like this before COVID was hard to imagine.

As a project team, we have achieved far more than we ever envisaged; having helped give guidance and findings to potentially changes in University working patterns and policies.  The Chameleon programme lasts for 12 months and this is where it comes to an end for or team. However, we hand over the baton now and the story continues. Only time will show what the university does to progress and evolve the changes it needs to our working patterns.

We have been fortunate in terms of the timing of our project and I feel that we have taken advantage of the situation to allow us to leave a legacy from Chameleon project on the university.

From a Chameleon Project, For the University

3D Object Photography

3D object photography can have many purposes from selling products to interactive learning. It can be a complicated process, but we recently found a way to do it at home or in the office.

The thinking behind this for FMS is for the ability to show things such as models of parts of the body for example, which students away from the lab won’t have access to. They can interact with the object, and look 360 degrees around it. You can use a host such as Sirv (Links to an external site.) to create an interactive object.

Below is an example of what can be created. It can be viewed in full screen from the Sirv website:  https://tracyncl3d.sirv.com/Head/Head.spin (Links to an external site.) 

Would you like to try it yourself? You can find a guide on this in the FMS TEL Community

https://ncl.instructure.com/courses/30988/pages/3d-object-photography-at-home

Using Canvas Commons

Michelle Miller shares her learning about Canvas Commons, which she has been using to share FMS digital skills content across multiple courses in Canvas.

Canvas Commons

Canvas Commons is a repository where Canvas course creators can upload all or part of their course for easy access and sharing within their organisation or to the Canvas public. You can use Canvas Commons to store your content (for your eyes and access only) or for wider use. It is an easy way to access and import Canvas content to multiple courses. This post will walk you through the steps of publishing part of your course in Canvas Commons.

Sharing to Canvas Commons

Begin by identifying the module, assignment, quiz, page, or other module content you want to share in Commons. In this explanation we will discuss sharing a module, but the same steps can be used for sharing a part of a module like an assignment, page, or quiz.

In the module title, select the three vertical dots and choose Share to Commons.

You’ll now be taken to the Commons uploading page where you will select settings for your Commons item.

Sharing and License:

                Toggle – Is this an update to a previous shared resource? This tool allows you to make updates to items you have already shared in Commons. These updates are pushed out to anyone who has imported your Commons content, thus allowing you to make changes and updates to content globally.

                Who can use this resource? – You can choose ‘Only Me’ for content you want to be able to import into future courses, but do not want others to have access to. Or, you can choose All of Newcastle University to give access to anyone at the university, or Public to give access to any Canvas User.

                Content Type – This allows you to mark the content specifically as a template or open textbook. This is optional.

                License – Choose the level of license you wish to apply to the content. This is especially important to consider when making the content Public.

                Add Additional Information – This is where you can enter the details for attribution, such as the author to credit and date of publication/copyright.

Metadata:

                Title – Give the item(s) a short but descriptive title that would help others locate and understand its content.

                Description – Provide a detailed description of the content. This should help others understand what is covered by the content.

                Tags – These optional items allow you to tag specific words or phrases that help identify and describe the content to improve search recall.

                Image – Choose an image to display on the Commons card for your content. You can upload your own image or choose one from the Canvas photo library.

Grades:

                Grade/Level – Use the slider to mark the appropriate grade level for your Commons content. This can span multiple grades, e.g. Undergraduate and Graduate.

Press the Share button when you have completed all the settings for your Commons content. You will now find your content under the Share tab in Canvas Commons. Remember, you can make changes to your Commons content and push updates in the future. You will be asked to enter version comments when doing this. It is recommended you note the date the update is processed.

Importing Canvas Commons Material

Importing Canvas Commons material is easy to do. Simply go to the Home page of your course and choose Import from Commons button on the right side of the screen. Search for the item by title, name, institution, or tag. Select the correct item then choose the Import/Download button on the right side of the screen.

Select the course or courses you want to import the content into and choose Import into Course. You will receive a message saying the content has successfully imported.

The content will now be shown in the relevant page in Canvas, e.g. a module import will be shown on the Modules page. You can then choose to edit the module, assignment, quiz, or page as you normally would in Canvas. Imported assignments will be shown at the bottom of the assignments page under “Imported Assignments”. You can make changes to content as you would edit your normal Canvas content.

Summary

Sharing to Canvas Commons is an easy and effective way to make your course content available to yourself in other courses, others within the university, or with the wider Canvas public. It allows you to access not only your own material, but material created by others that you might find useful for your course. It also allows you to showcase your material to the Canvas public.

Using discussion boards

Discussion boards seem like a good idea, especially when students are distant to campus as posts should be able to increase collaboration as well as socialisation. But so often students fail to use them despite the work staff put in to set them up. So how can we engage our students to post on the online discussions?

What are your goals?

Before you set up a discussion board, consider what your goals are, as well as what the students might expect to get out of using the discussion board. Are you trying to check student knowledge and understanding? Develop better contact/collaboration between members of your group as a community? Answering queries? All of these and more…

Decide what you and your students should get out of discussion board use, and then think of tasks accordingly. For example, you could start with an icebreaker board to help socialisation, not necessarily related to the course, such as ‘using the student lists provided, contact two other group members and with their co-operation find out and post two facts that no-one else will know about them’. This promotes a feeling of safety when posting; without this safety students seem as shy as when being asked to talk in class.

For knowledge and understanding activities it is better to use reflective tasks rather than knowledge answers which may end up very similar to each other. For student questions on course content, and especially assessment, set up boards which can be contributed to anonymously: this provides a safe space without risk of ridicule.

Example of discussion boards in Canvas

Manage expectations

If you expect students to contribute to the discussion boards, tell them so, both in synchronous sessions and on Canvas. But make it easy for them to contribute by having tasks which encourage participation. Boards which students know will contribute to learning for assessment are likely to receive more posts. If you just ask for knowledge answers, the answers tend to be given in full by keen students, with later posts being ‘ditto’ rather than useful commentary, so make them apply their knowledge in some way.

Also remind them about netiquette; good manners online is just as important as in face-to-face situations. This also contributes to the idea of a safe space for posting in.

Teaching presence

When you set up your discussion boards you need to decide how much input you need, and are able, to provide. No input is not an option if you expect students to post because it is demotivating as a student to not receive some sort of feedback or encouragement. As part of expectations management, let students know how often you will look at the board, and if you will provide class or individual feedback. If you have a large class you won’t have time to read every post. You might like to consider putting students into groups with a spokesperson in each group to summarise the group’s posts for you to read. Or get students to peer review each others’ comments. You can weave their answers into one feedback post.

When you comment, try to keep the discussion going, rather than just providing the answer which tends to kill any further discussion: think commas rather than full stops. Ask open questions to keep the discussion moving on, and make it human (‘I always find this difficult….’ when the class is struggling).

Discussion board example (used with permission): ask questions to elicit further responses

You will always have some students who ‘lurk’, failing to post anything at all themselves. You can minimise this by making the discussion boards a safe space for posting, and providing encouragement to participate with enthusiasm for the subject and student contributions.

Overall, discussion boards are a useful tool to keep an eye on student learning and engagement, although they do require much staff input to ensure student participation.

FMS TEL Webinar – Podcasting

This webinar ran twice on 21st April 2021, and we were happy to see colleagues from across the faculty and NUMed in attendance.

The webinar covered:

  • Teaching strategies that are well-suited to audio content.
  • Types and forms of content that suit audio delivery.
  • The basics of recording audio, uploading it and making alternative accessible content (in resources).

Colleagues can find the resources from the webinar – including the recording and links to further reading – on the FMS TEL Community in Canvas. If you have trouble accessing the community, please get in touch via fmstel-enquiries@newcastle.ac.uk 

View all FMS TEL Webinars

From Blackboard and Ngage to Canvas

In the summer of 2020 Newcastle University switched from Blackboard to Canvas. In truth, some online modules had been hosted on Canvas months before the official launch, but from August 1st 2020 Canvas was the exclusive Virtual Learning Environment (VLE). The content that had previously been in Blackboard was transferred over to Canvas, creating three years’ worth of archives. For the majority of courses this was fine, as Blackboard was only ever a repository for course materials. For the e-learning courses offered in the FMS Graduate School and the School of Medical Education, there was an additional challenge.

In addition to Blackboard, e-learning courses also used Ngage, a bespoke VLE used widely throughout FMS. Quizzes, assignments and discussion boards could all be found on Blackboard, but Ngage was home to the actual content, typically released weekly to students. Where Blackboard content could be migrated en masse, anything on Ngage had to be migrated over manually. Page by page, course by course, for all three semesters.

The Ngage user interface.
The Ngage user interface. (Click the image to see a full size version – opens in a new tab)


Once the content was copied over, we had to adapt it to fit the new platform. Discussion boards and assignments were like for like, but certain Blackboard features such as blogs and eJournals had no direct equivalent on Canvas. This required creative problem solving to adapt Canvas to our specific needs, and with help from the Canvas Community we were able to find solutions. For example to create an eJournal, a staple of many of our modules, we had to assign every student to their own private group, and then set up a regular discussion board as a ‘group discussion’ and selecting the pre-prepared eJournal groups, thereby creating a private area for students to make notes on the different topics and have the module leader’s check over them.

The same page on the new Canvas VLE. A less clutter page with a built-in discussion board and a crisper overall presentation. (Click the image to see a full size version – opens in a new tab)


A lot of visual features and formatting were also lost during the copying and pasting process, meaning pages previously adorned with images and embedded materials had to be reworked. We utilised the web design skills of the FMS TEL Team and with a bit of creativity were able to create interactive features such as click and reveal, and visual aspects, such as shadowboxes, to help emphasise particular pieces of text.

As well as the migration of content, a huge effort was made to train University staff in the run up to the 2020/21 academic year. Training sessions that had originally been scheduled in-person were instead delivered via Zoom, covering areas such as Canvas essentials, assignments and quizzes. To supplement the training, a Canvas orientation module was created to help ease staff into the transition. Additionally, every member of University staff was assigned their own sandbox course allowing them to experiment with the new platform and test out features that could be replicated in real courses.

The Canvas orientation home page. (Click the image to see a full size version – opens in a new tab)

Now that we are exclusively using Canvas, the feedback has been overwhelmingly positive. Despite some initial challenges with the practicalities of using a new VLE – and some trial and error – new Canvas features such as Zoom integration, built in calendars and Speedgrader have enhanced the user experience.

Dealing with extra sensitive data in the Medical Learning Environment (MLE)

Most FMS sites run by the unit contain and maintain personal data that needs to be kept private. Techniques such as securely certified websites and authentication/authorisation portals are usually sufficient in keeping this data safe.

The Challenge

With the introduction of the new year 4 in the MBBS curriculum and the move to more blended learning, a higher degree of sensitive data was required to be stored on the Medical Learning Environment (VLE for MBBS). Year 4 students are now asked to keep electronic records of patients and interactions as part of the Advanced Clinical Experience module. This data contained personal contact details such as address, telephone and email of patients the students would follow on the clinical journey, and let them reflect upon this experience throughout year 4.

So before the start of Year 4, in the summer of 2020, we investigated and implemented an enhanced way of storing this patient information in the MLE.

The Solutions

First we investigated how the data was stored in the backend database. Most information is stored in databases as unencrypted data due to the lack of sensitive nature of the data.

This new data required something else. It was decided that parts of the data that could contain personal patient information should be encrypted, both in transit and at rest.

For parts of the ACE model (the data structure we use for the ACE section of MLE) we replaced the open text fields with this new encrypted field. This now meant that when data was entered and saved, before it was added to the database, the system would replace the open text with a encrypted data set using a secure key. To read the data again it would need the use of the decrypt method, that only the MLE could do by using the secure key.

The second part we investigated was to detach any personal patient information from the student’s reflections. Once the student had completed the recording of the patient’s details, the direct link in the website was removed and generic patient information used from that point onwards to identify the individual records. This kept the sensitive information separate from the day to day recording of patient interactions.

The students also uploaded consent forms signed by patients who agreed to take part in the ACE module. Final versions of consent forms highlighted that these would also contained sensitive information.

After further investigation the development team included these static files in the encryption methods used to support ACE. In order to allow students to verify the uploaded consent forms, the MLE allows a short window before encryption and archiving of consent forms takes place. Once this process completes the consent forms are no longer accessible via the website (MLE) and recovery if required is performed by a limited number of staff in FMS TEL.

These methods used may be a little extreme for the day to day data stored on most FMS sites, but the investigations and lessons learned from the ACE data has provided us with options for other sites in the future.

If you are interested in this topic and wish to learn more, please contact:

Dan Plummer, Learning Technologies Developer, dan.plummer@newcastle.ac.uk

John Moss, Technology Enhanced Learning Manager, john.moss@newcastle.ac.uk