Below are some of our favourite uses of H5P from within the Faculty. If you have an example to share, please get in touch.
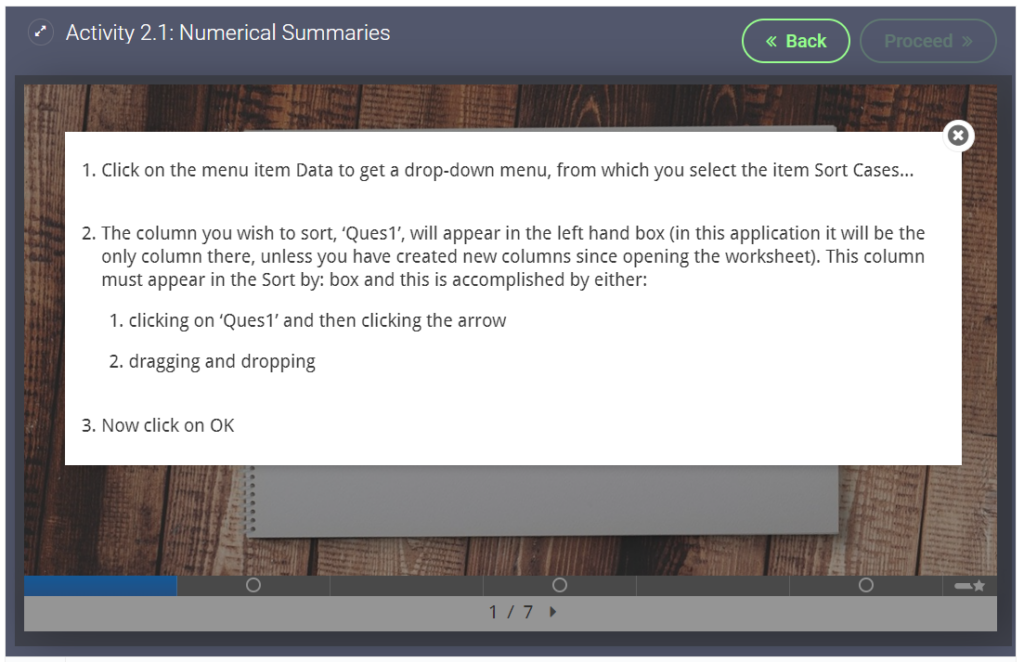
Fill in the Blanks for Click to Enlarge images
Students often complain that diagnostic images are too small to see clearly. A solution we found was to use H5P Fill in the Blank activity (without a blank).
Example from ONC8004. (Original image has been replaced to protect patient confidentiality)
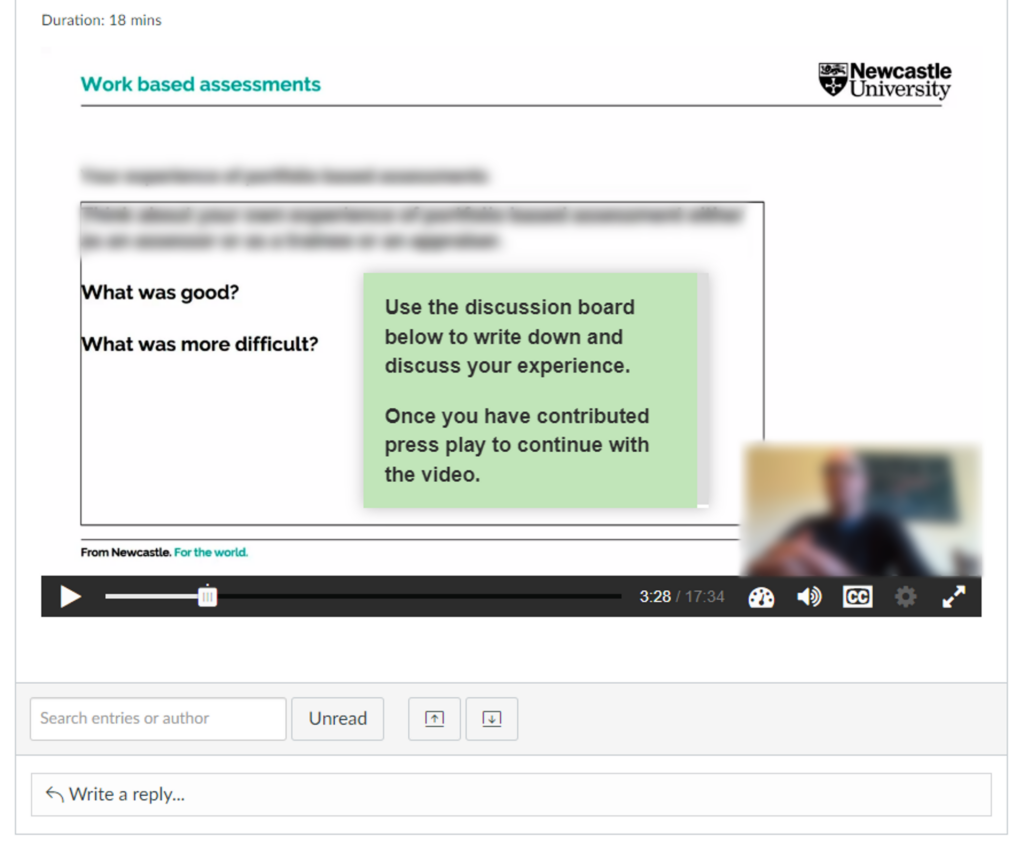
This video was originally designed to be watched in a classroom setting, where the video would be paused for an in class discussion. When the course was moved online we used H5Ps interactive video to auto pause at the right moment and we embedded the video in a discussion board.
Video auto pauses (at the white dot) and asks students to contribute to a discussion board task
We created a 360 tour through a large lab in the School of Biomedical and Nutritional Sciences. This was to familiarise students with the lab before attending in person, but also to show the labs to students working at a distance.
We created a 360 image of the new Nutrition Kitchen with hotspots highlighting some common hazards. Clicking on the hotspots will show a close up image of the hazard and/or some information on why it is a hazard.
I often copy and paste bits of text from one place to another, but don’t necessarily want the formatting that comes with the text. Just using Ctrl + V, or selecting ‘paste’ brings that formatting across. This means that text might look ‘odd’ when pasting it into another document, or something like a Canvas page.
The Method
Windows: Ctrl + Shift + V
Mac: Option + Shift + Command + V
The Solution
This means you just keep the characters, meaning your pasted text looks the same as the rest. This works in lots of desktop applications.
Microsoft Applications
To do this in Word, right-click and select ‘paste without formatting’ as below.
This post covers the pros and cons of different ways to upload and manage files in Canvas
As the e-learning modules in FMS are now going live, the team have been looking at ways to manage uploaded files in Canvas.
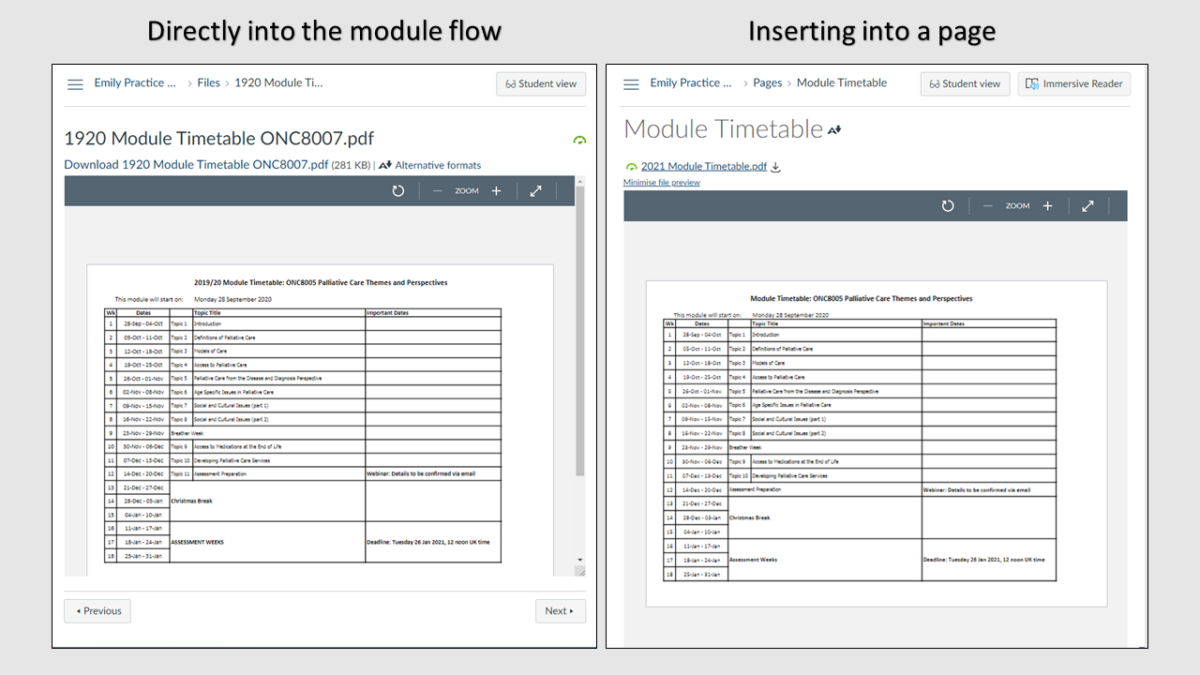
There are two main ways to add files to your module flow in Canvas:
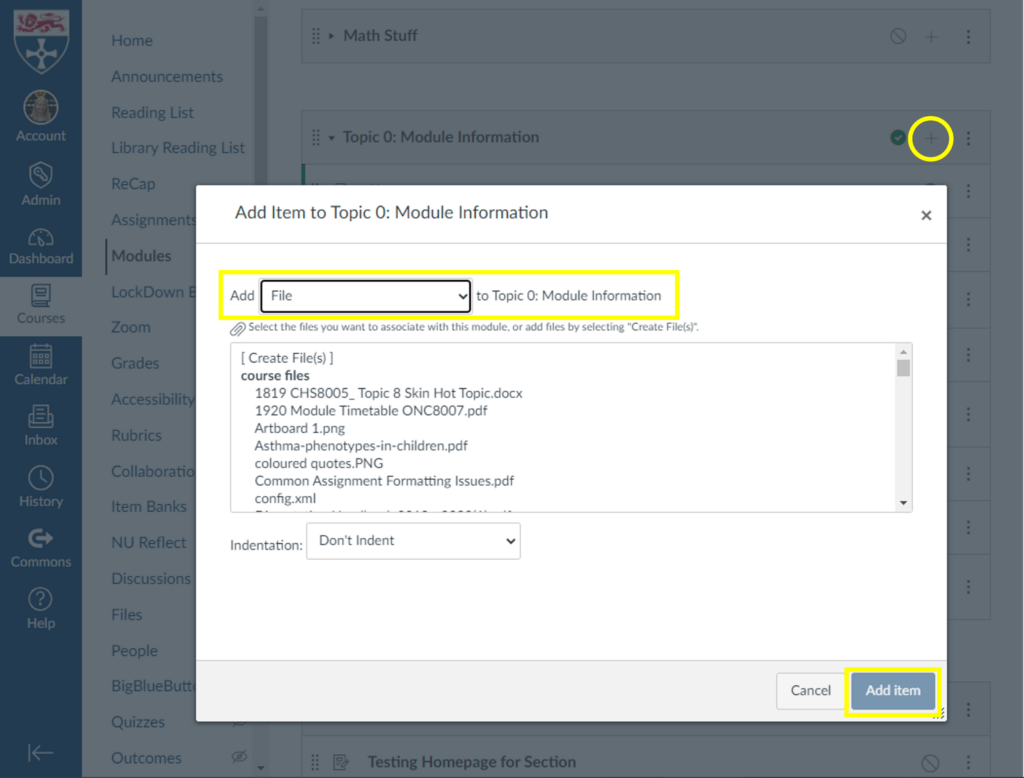
Directly into the module flow
+ > Add File > Add Item
This method is by far the easiest and quickest way to add a file to your course, and is a great choice if the file will not require updates.
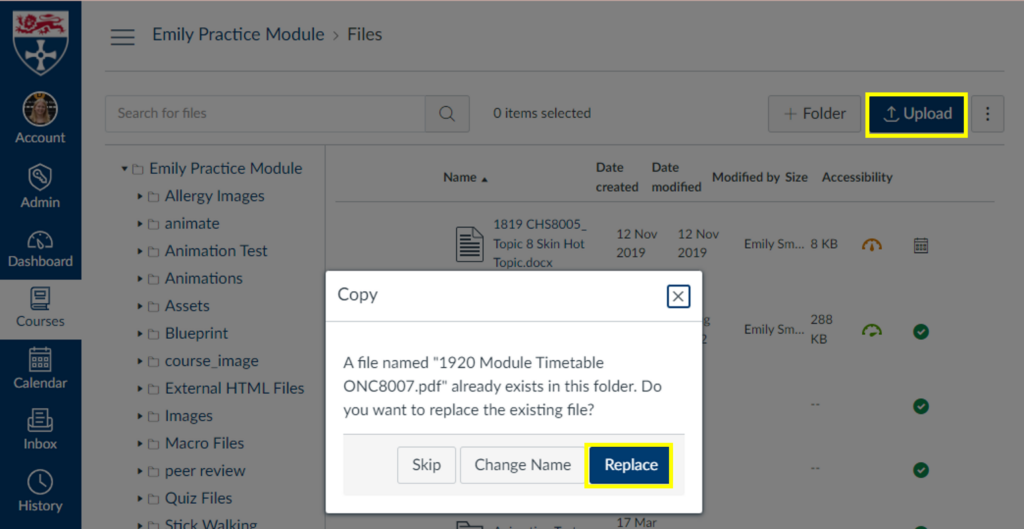
If you need to replace the file with an updated version, it is best practice to upload the new version directly to the files area and replace the original file. The file names need to be identical and uploaded to the same folder for the “replace” option to appear. Updating the file this way means any links to the file within the content will not need updated.
Upload > Replace
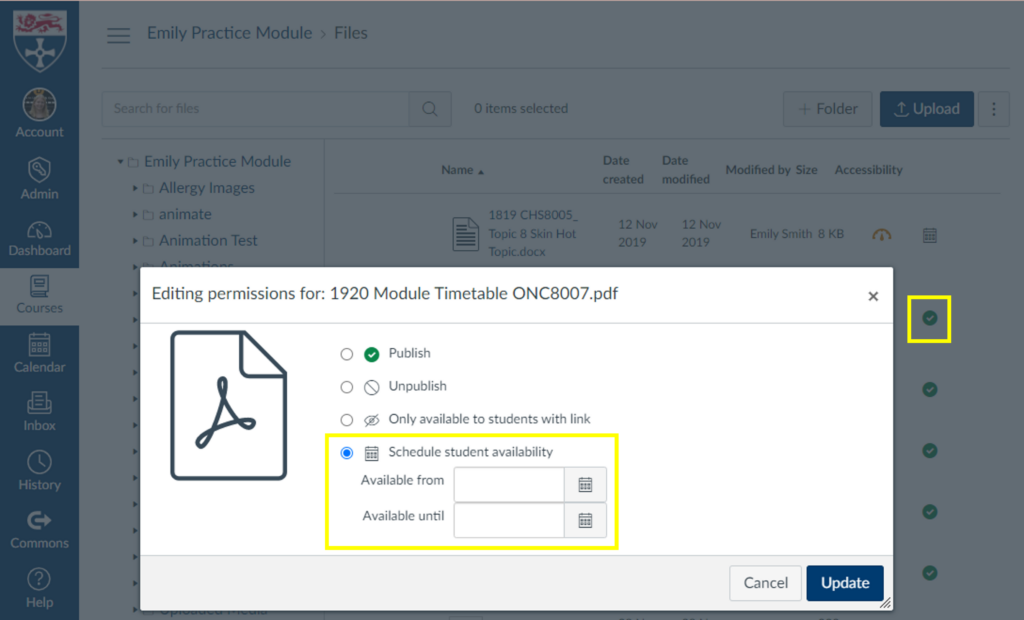
In the files area you also have the option to adjust the availability of files, including adding available from and until dates.
Click the green tick next to the file to open the availability options
Inserted into a page
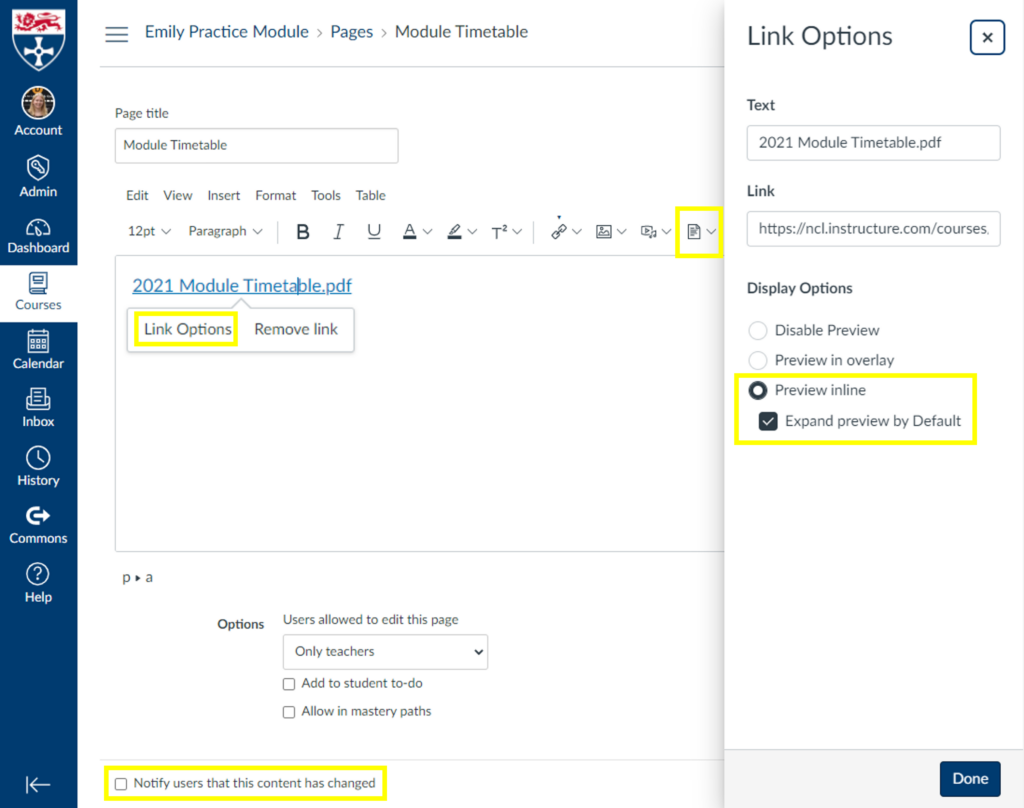
View of options available for a file inserted into a page in Canvas
This is my preferred method for adding a file to a course. You can use ‘Link Options’ to make the file open a preview by default so the page has the appearance of a directly added file but you have the following benefits over adding the file directly:
Able to add notes or comments above or below the file
The page title does not have to be the file name
Any links will be directed to this page so you can update the file/page as many times as needed and links to the content will still work
You can create an archive at the bottom of the page for previous file versions
Canvas can notify students of changes to the page/file
You have access to the page history so you can roll back to previous versions
You can add multiple files to one location
You can add a to-do deadline to the students to do lists and calendars
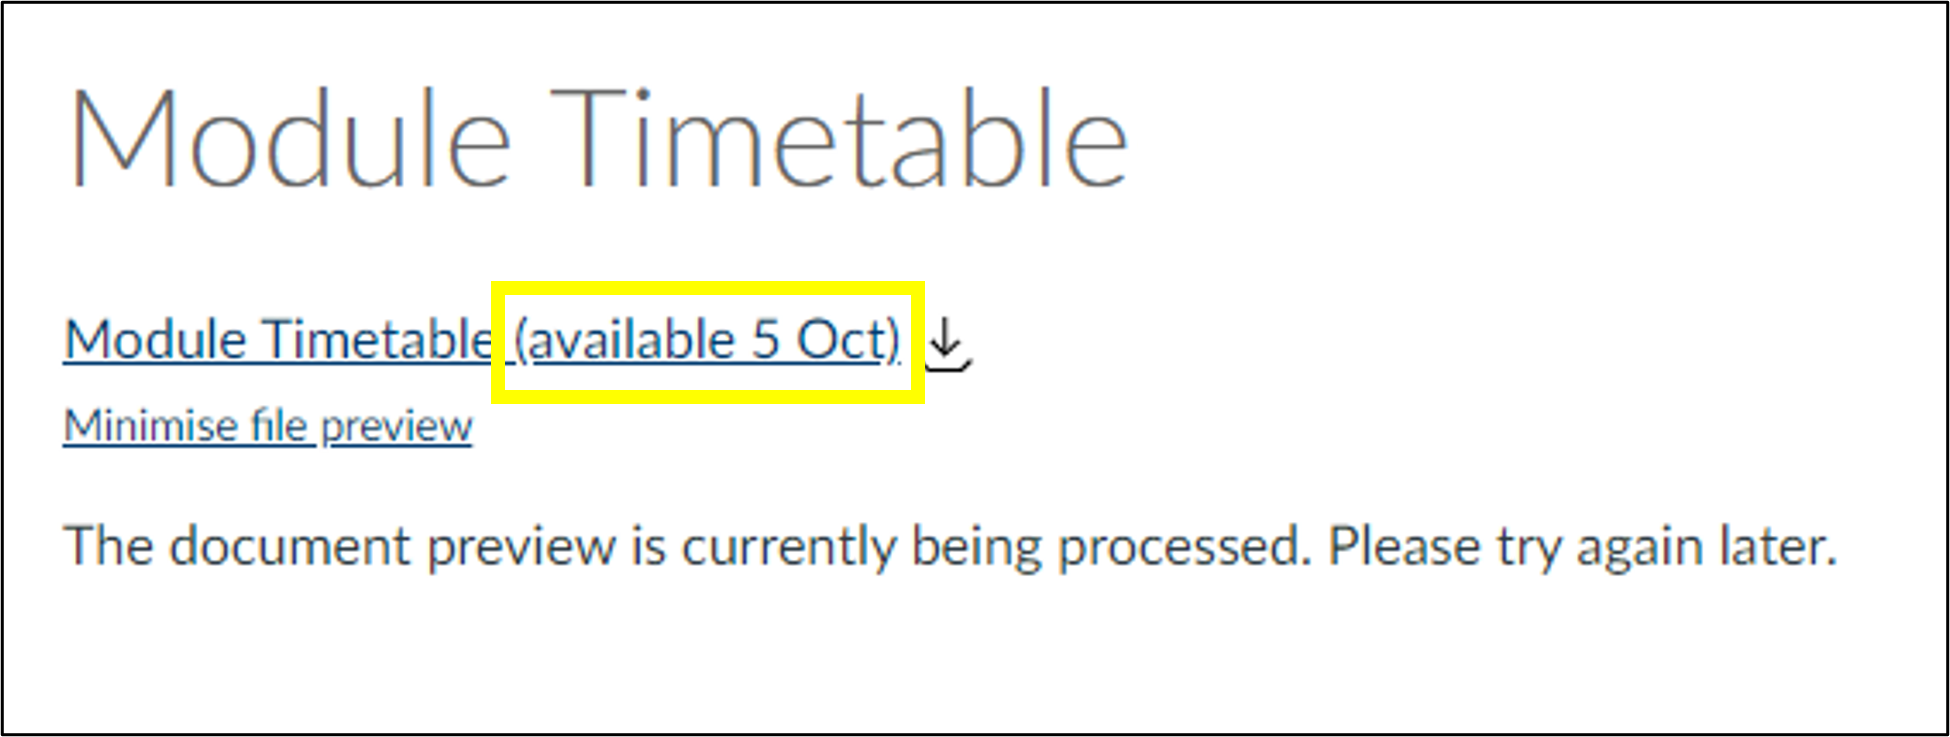
If you choose to use the file availability options mentioned in the previous method you may want to add a message on the page stating when the file will be available as the message canvas provides is not very informative:
Canvas Message: The document preview is currently being processed. Please try again later.
Keeping track of your files and file names within your module helps you save time and avoid confusion later.
Quick wins in accessibility by using Adobe Acrobat Pro’s built-in tool.
In FMS TEL we are currently working on accessibility as new module materials are being prepared for release. Did you know that Adobe Acrobat Pro has a built in Accessibility tool that not only checks your document’s accessibility, but helps you improve accessibility with the click of a few buttons?
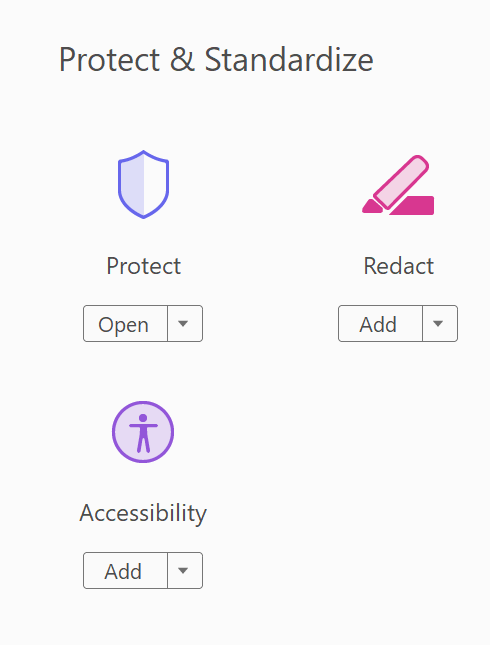
If you find that your PDFs are receiving low accessibility scores in Canvas, you can use Adobe Acrobat to improve their scores quickly and efficiently. Simply open the file in Adobe Acrobat Pro. Then select the Accessibility tool from the Tools options. (Click on More Tools then scroll down to the Protect and Standardize section.)
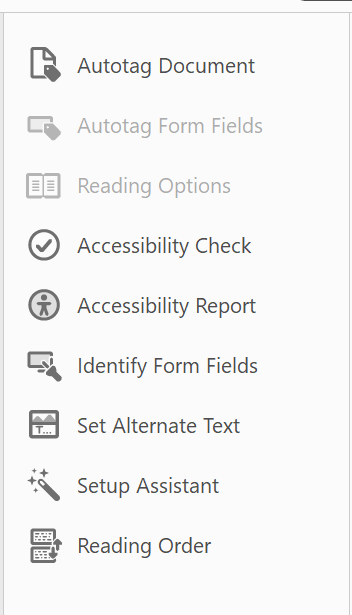
Begin by selecting the Accessibility Check. This will tell you what can be improved in your document.
Next you can use the Autotag tool if your document is missing tags such as headings.
You can choose Set Alternative Text to add alt text to your images.
If necessary use the Reading Order tool to set the order in which the document should be read by a screen reader.
With these three easy steps you have vastly improved the accessibility of your document! Try adding it back into Canvas and you will be surprised by the results you get.
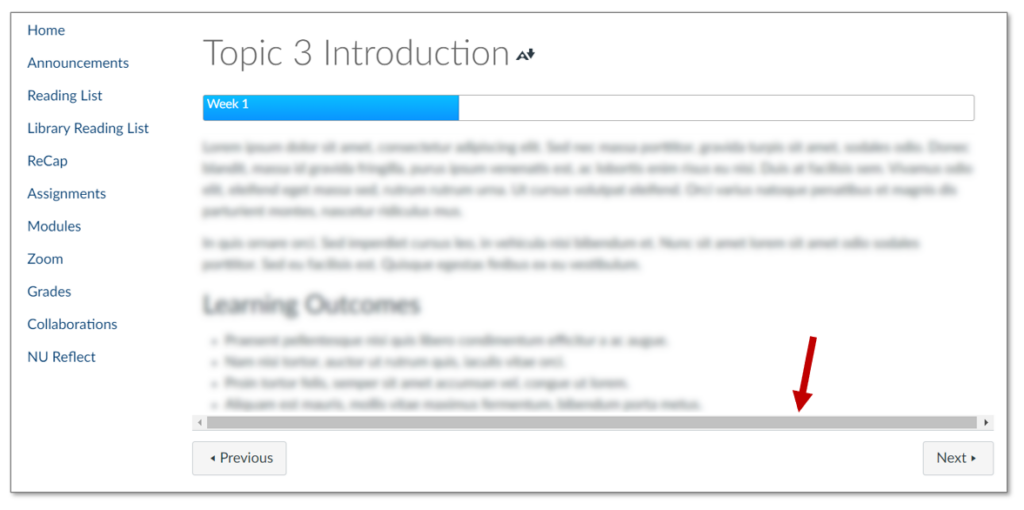
I recently noticed a few pages in my content in Canvas had developed scroll bars at the bottom. The bars were greyed out and had no function.
Scroll bar visible at the bottom of the page
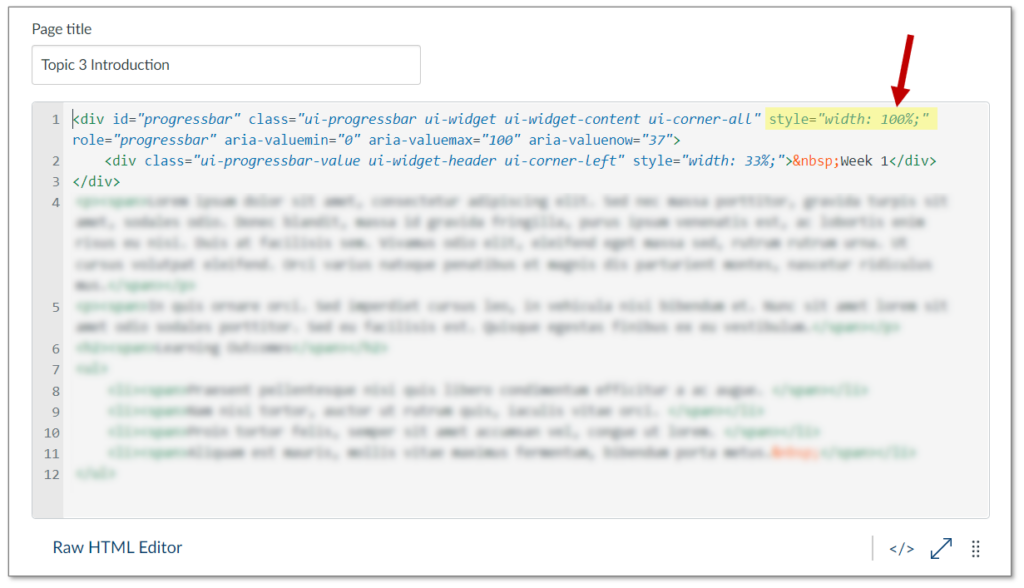
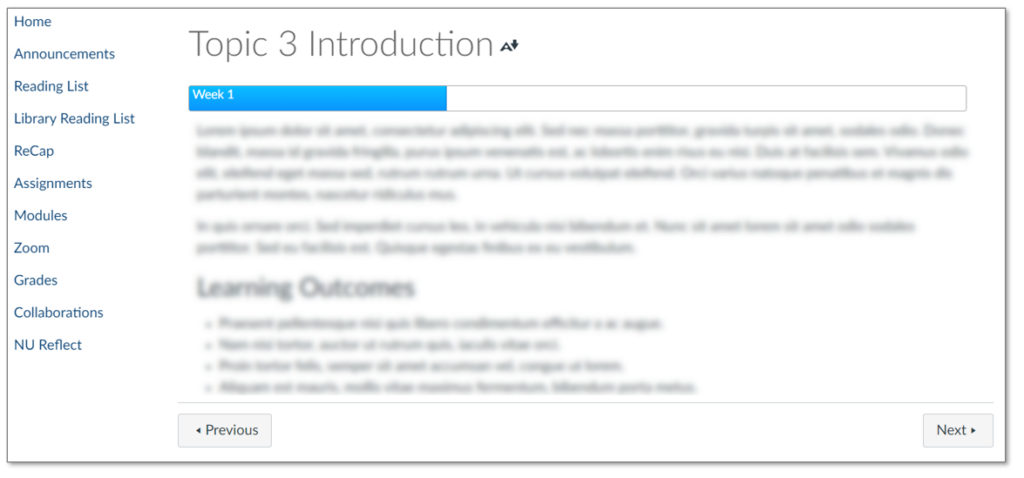
I started to notice a pattern. Any content which took up the whole width of the page (100%) was triggering the scroll bars. It could be any type of content; a banner image, an embedded padlet, or like in my example progress bars.
The Fix
Canvas must have changed the HTML “overflow” settings somewhere on their end. An easy fix is to adjust any 100% width content to be 99% instead. This can be done in the HTML editor area accessed by this icon in the edit screen: </>
Canvas HTML editor showing width elementScroll bar has disappeared
We recently delivered a quick Canvas Booster session for Population Health Sciences Institute, which covered Quizzes, Discussion Boards, Accessibility and H5P. You can find the recording and resources for this session in our Canvas Community.
FMS TEL recently delivered a quick Canvas Booster session for Population Health Sciences Institute, which covered the themes below. You can find the recording for this session in our Canvas Community. Other resources are shared below – you may need to log in to Canvas to access these.
How do oral presentations work for 100% online modules?
Presentations helps students put across an idea while expressing their personalities, which is hard to do in an essay.
Introduction
Oral presentations are a popular choice of assessment in the Faculty of Medical Sciences, especially in our e-Learning modules. Students are asked to submit a pre-recorded presentation to Canvas and the markers watch the presentations at a time and place that suits them.
Diarmuid Coughlan, module leader for ONC8028 Practical Health Economics for Cancer, has kindly agreed to walk us through how the Virtual Oral Presentation element works on his module.
The Assessment
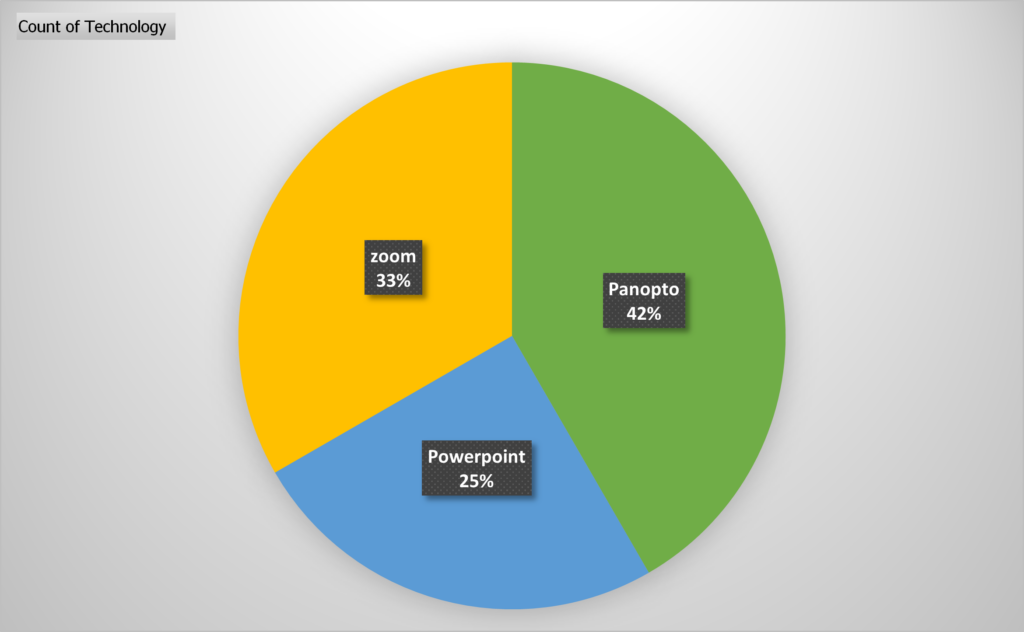
This year we had 14 students on the module. We asked the students to create a 15 minute presentation using either Zoom, Panopto (Recap) or PowerPoint.
We informed the students right at the start of the module that an oral presentation was part of the assessment and 4 weeks into the module we provided a formative assessment. The formative assessment allowed students to familiarise themselves with their chosen software, gain experience talking to a camera and also get some limited feedback on their presentation skills.
The submissions are double marked by 2 markers. Marking is completed separately by each marker outside of Canvas, then markers meet to discuss which marks/comments would be entered into Canvas and made visible to each student.
The Set Up
We provided 2 submission points in Canvas:
Recording Submission Point:
This area was used for the marking. It was set up as Media Recording for MP4 uploads (max of 500 mb) with a Text Entry option for Panopto users (no size limit).
We allowed students to choose which technology they were most comfortable with and provided video and written instructions for Panopto and Zoom. PowerPoint instructions were added later as an option with links to guidance provided by Microsoft.
View of instructions in Canvas
We also provided some instructions so students could crop their recordings to comply with the 15 minute time limit.
You are limited by time so remember to edit your recording so it is no longer than 15 minutes. Instructions: Windows | Mac | Panopto
Slide Submission Point:
This area had a 0 point value. It was set up as a File upload area for students to submit their slides as .ppt or .pdf, this allowed us to get a turnitin plagiarism score for each presentation as well as a reference copy of the slides, should anything be unclear in the video recordings.
How did it go?
There was a lot of fear from students initially. We encouraged students to give it a go, informing them that we were not trying to trick them. We provided clear guidance on what we expected and provided a rubric with a breakdown of points, clearly showing only a small percentage of the grade would be based on their presentation style and delivery. The content of the presentation was the most important part!
The use of technology was varied:
As markers we also had to overcome our fears of technology.
PowerPoint is easier once you know how to access recordings (you have to download the file, then click start slideshow).
Sometimes the Panopto recordings were hard to find, especially if students had experience of using the technology in Blackboard and did not follow the Canvas instructions correctly.
What are your next steps?
We only provided grades with a short feedback comment last year, we plan to provide more extensive feedback going forward
We will add more video content into the module as examples of how to create engaging slides and showcase our presentation styles – hopefully leading by example
We would also like to provide examples of a good presentation vs a bad presentation
All of our posts about this conference can be seen under the tag NULTConf2022.
This lightning talk was presented in person at the Learning and Teaching Conference 2022. Newcastle University staff wishing to access the resources and the recording of the previous extended online version can do so here.
Key Points:
Commons in a cloud storage for Canvas items
Can upload and download pieces to and from your courses
Allows you to promote your material to the Canvas Community if you choose to do so
Over the past few months, the FMS TEL team have been working on bringing a Massive Open Online Course (MOOC) to life. The course, Exploring 3D Anatomy, is an active, hands-on, and engaging online course now available to Newcastle students and staff! The course was designed by Dr Iain Keenan of Newcastle University and Mr Leonard Shapiro of the University of Cape Town.
3D spatial awareness is a cognitive function. Improving it improves students’ 3D visualisation ability and spatial skills in anatomy learning.
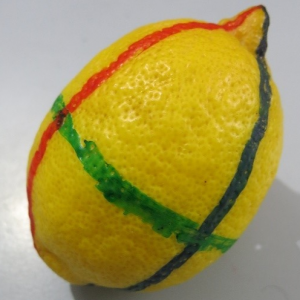
In our experience, medical, dental, and other healthcare students can experience significant challenges in 3D spatial anatomy. Because of the three-dimensional arrangement of the human body, student spatial awareness can be a major influence on their anatomical education. In this online course, students can practice several easy-to-follow, hands-on exercises that we have designed to address and improve 3D spatial awareness. Video demonstrations by Iain and Leonard guide students through each activity, which involve the use of readily available household objects such as a piece of fruit, a jar, or a fork.
As simple as these exercises are to follow and carry out, the effect of such activities on improving 3D spatial awareness can be notable. What’s more, the exercises can be enjoyable too!
The Fruit Exercise: a guided dissection of this 3D object can improve 3D spatial understanding of the anatomical planes.
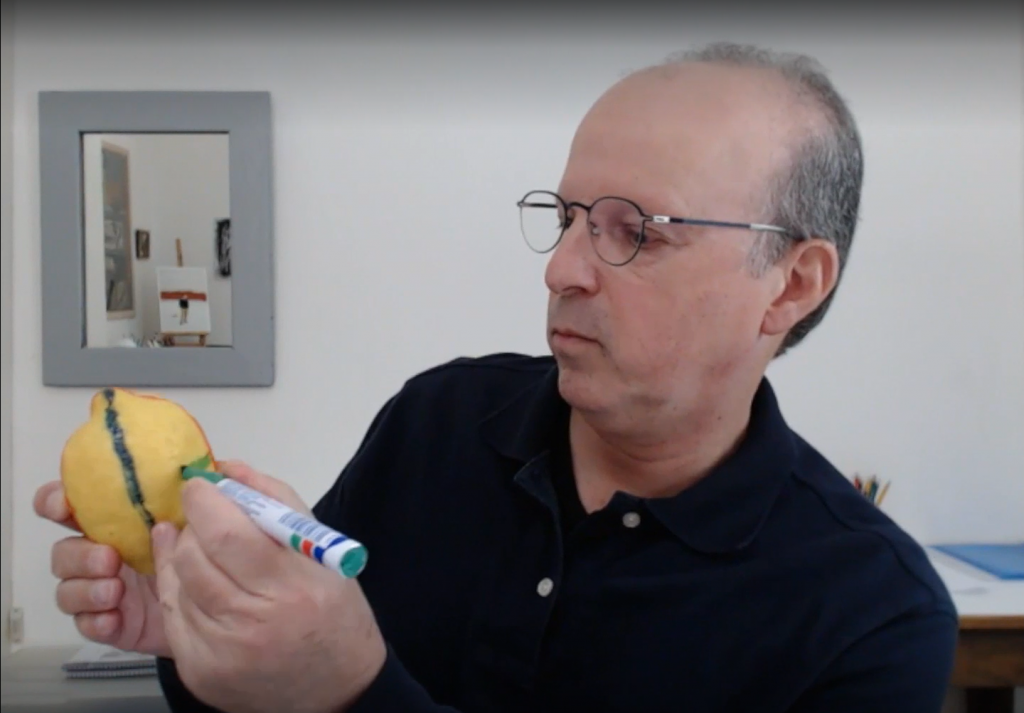
The practical exercises in the course are demonstrated by Iain and Leonard on video, allowing students to access the content at their own pace. These videos show the exercises in detail and allow students to hear the conversation as the exercise unfolds. Videos are short and simple to follow, and have been captioned by the team to ensure clarity.
Leonard Demonstrating the Fruit Exercise with a LemonIain Starting the Fruit Exercise with a Lime
All Newcastle University staff and students can join the Canvas course, which is structured in three parts and requires around 4 hours of activity in total. We hope to expand access to an extended version of the course in 2022/23. For further information, please contact Dr Iain Keenan.
Contacts
Dr Iain Keenan, Senior Lecturer in Anatomy, School of Medical Education, Newcastle University
Mr Leonard Shapiro, Observation and Spatial Awareness Teacher, Department of Human Biology, University of Cape Town
Further Reading
This course is supported by the following research:
Backhouse, M., Fitzpatrick, M., Hutchinson, J., Thandi, C.S. and Keenan, I.D. (2017), Improvements in anatomy knowledge when utilizing a novel cyclical “Observe-Reflect-Draw-Edit-Repeat” learning process. Anat Sci Educ, 10: 7-22. https://doi.org/10.1002/ase.1616
Ben Awadh, A., Clark, J., Clowry, G. and Keenan, I.D. (2021), Multimodal Three-Dimensional Visualization Enhances Novice Learner Interpretation of Basic Cross-Sectional Anatomy. Anat Sci Educ. https://doi.org/10.1002/ase.2045
Branson TM, Shapiro L, Venter RG. Observation of Patients’ 3D Printed Anatomical Features and 3D Visualisation Technologies Improve Spatial Awareness for Surgical Planning and in-Theatre Performance. Adv Exp Med Biol. 2021;1334:23-37. Available at https://pubmed.ncbi.nlm.nih.gov/34476743/
Reid, S., Shapiro, L. and Louw, G. (2019), How Haptics and Drawing Enhance the Learning of Anatomy. Anat Sci Educ, 12: 164-172. https://doi.org/10.1002/ase.1807
Shapiro, L., Bell, K., Dhas, K., Branson, T., Louw, G. and Keenan, I.D. (2020), Focused Multisensory Anatomy Observation and Drawing for Enhancing Social Learning and Three-Dimensional Spatial Understanding. Anat Sci Educ, 13: 488-503. https://doi.org/10.1002/ase.1929