From August 2021 all colleagues will be able to create interactive content with H5P. No coding or software is required, all you need is a web browser.
Take a sneak peak at what content types are available on the H5P website (please do not create an account just yet) . Read more about the launch on the LTDS Blog.
If you would like to get early access to H5P, receive updates, or help our evaluation please Join the H5P Community.
As a follow up to that webinar we have created follow along video guides and step by step written instructions on how to make the ideas and suggestions a reality. Our guides cover:
Voting and Polls ✅
These can be set up in around 2 minutes and no external tools are required. Students can quickly share their opinions or provide feedback in a similar format to Social Media.
Discussion Folders ?
Is your modules area looking cluttered? Organise your discussions into folders so they are easy to navigate.
Sharing Group Discussions ????
Group discussions in Canvas can be a great option however they have the disadvantage of only group members being able to see what was contributed. If your course would benefit from groups being able to share with other groups after the task then we have 2 solutions for you.
Multiple Posting Points ??
Some courses may require students to share personal experiences. In this guidance we offer a solution for student to choose if they post to the whole cohort or just to the Teachers on the course.
Anonymous Posts ft. Padlet ❔
Currently Canvas does not allow anonymous posts. To get around this limitation we can create boards using an External Tool Padlet and embed Anonymous Padlet Boards within Canvas and the MLE.
Guest post by Sue Campbell from the FMS Graduate School, Module Leader for ONC8024: Chemotherapy Nurse Training.
The Challenge
In December 2020, we were informed that Lancashire Health would be sending their Nursing students to study our course, which was due to start in February 2021. We had already seen an increase in our own numbers so with these additional students we were going to be expecting a much larger cohort than usual. The increase was in part due to the COVID situation and study leave cancellation in the NHS. We needed to investigate if the course structure would be suitable for 50 students instead of the usual 10-15 we had taught in previous years.
What did you do?
We reviewed each activity and imagined how it would work with 50 students. Activities that students completed on their own such as crosswords and quizzes were fine.
Our main concern were the collaborative wiki tasks – these are pages within Canvas, usually involving a table, that students completed together to create a resource. We wanted to keep these tasks as they encouraged teamwork, but the tasks were not suitable for 50 students to be able to contribute. After discussing the problem with others who have experience of working with larger cohorts we came up with a solution.
With help from the FMS TEL Team we were able to separate the students into groups of 10-15 students and provide each group with their own collaborative wiki task to complete. Once the course began we experienced registration issues so students were all starting at different times. We decided to adjust the groups so the late starting students would be in the same group and would not feel left behind.
“It’s about finding solutions you are not aware of; groups was a really quick and effective fix for what I envisioned to be a much larger problem.”
We wanted to keep the discussion tasks as they worked well in the past but would they work with large numbers? We went through each discussion task and made changes.
Where we had previously asked students to discuss three points, we changed so students could choose one discussion they could take part in but were able to view all discussions.
Modified Discussion Board: Before and After
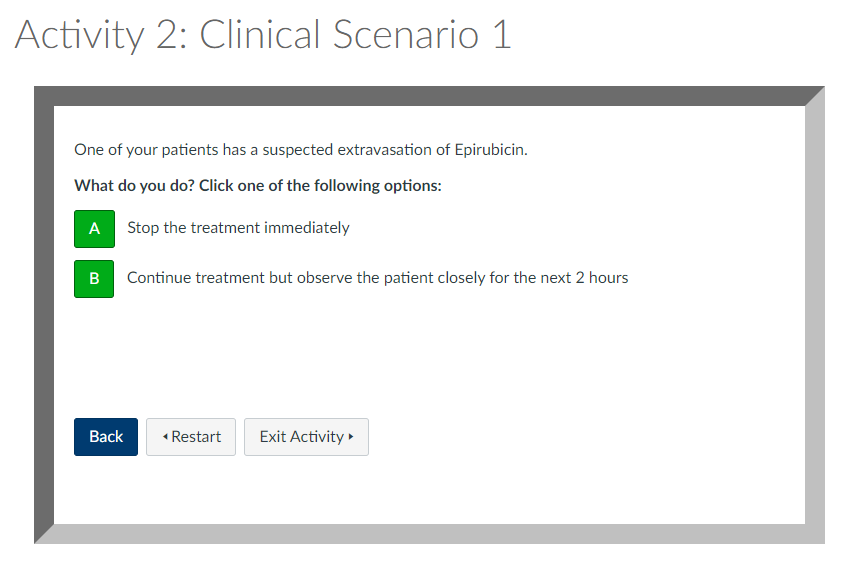
We decided to change the scenario discussions into branching activities instead. The questions asked in these discussions had only one right answer and were more of a fact checking exercise than something the students discussed. Students could complete the branching activities independently, so cohort size did not matter, but the objective of the task was still achieved. We also added a presentation to summarise the learning from the scenarios which replaced the interaction from the Module Leader that would have usually occurred on the discussion board at the end of the week.
Branching Activity
Tips
Ask for advice – I spoke with the FMS TEL and Programme Teams and they provided several solutions I wasn’t aware of. I also spoke with our DPD, Victoria Hewitt for marking help
Consider running the module twice a year if numbers/demand remains too high to sustain within one cohort
Branching activities will work regardless of numbers so we can easily roll those over year after year now
Groups in Canvas is easy to turn on/off and adjust depending on numbers
What might you do differently next time?
We shall wait and see the student feedback but we are currently in week 5 of the course and so far it is going well and the group work is successful. Some things we are thinking about are:
We have a lot of activities, but they are now largely peer to peer or independent tasks so to bring back the teacher presence I would like to include more videos and presentations
We do provide a general Q&A discussion board, and for the rest of the course we are also introducing fortnightly, 10 minute 1:1 Q&A bookable slots via zoom for any students preferring a one-to-one discussion with the tutor.
“A glossary is a great reference tool for a student, especially when they’re studying material which is quite technical and contains a vocabulary which is specific to the subject.”
David McGeeney, MCR8019 Module Leader
“Well, our students come from a diverse range of professional backgrounds, are based in different countries and have different experiences. And when you’re dealing with clinical scenarios you really can’t afford to allow confusion and misinterpretation to happen, especially where the subject material is quite technical. Adding a glossary to ONC8004: Developments in Diagnostic Imaging in Oncology allows us to focus the webpage content on teaching and learning whilst linking to explanatory terms for those who need it.”
Victoria Hewitt, ONC8004 Module Leader
Benefits of using a Glossary
Ensures all students are familiar with discipline specific vocabulary
Provides a reliable reference tool students can use throughout their studies
Content can be more concise
Easy to create
Can be rolled over year after year
Making your own Glossary
It could be as simple as having a dedicated page located near the start of the content which students can reference throughout the course.
You can view example glossaries in the FMS Community, along with instructions on how to add navigation options such as an A-Z menu at the top and ‘Back to top’ links.
Over the past couple of months I have been talking to a lot of teaching colleagues about how they use quizzes. A quick summary of some uses for quizzes can be found below. There are two quiz tools available in Canvas (old and new quizzes), as well as a lot of web services that offer quiz functionality.
Using quizzes before synchronous seminars allows students to check their knowledge and make sure they have understood things correctly before entering into a discussion. This boosts confidence and allows them to participate more effectively in the session, knowing they have definitely grasped the concepts. This is especially useful with topics that are very abstract or contain a lot of new concepts or terminology. The case study with Rosalind Beaumont and Lydia Wysocki can be found on the LTDS case studies site.
Quizzes can also be used in the sense of providing test-enhanced learning opportunities for students. Regular short quizzes encourage students to retrieve the information they have remembered and put it into practice, boosting knowledge retention. The case study with Nick Riches can be found on the LTDS case studies site.
Another use for quizzes is to use them to replicate a workbook – something that might be used in Present in Person (PiP) teaching to guide students through a series of problems as teachers monitor the room. Here the quizzes are instructive and challenge students to find the information they need, practicing the skills they are learning. Detailed feedback and extra information allows the students to step through the processes they are learning and approximates the monitoring that may be done in the classroom by anticipating difficulties that may need clarifying. Teachers can then look at analytics or ask students to send questions to identify anything that needs further explanation. More information can be seen in the case study with the Library Liaison team.
When testing higher-order thinking skills such as evaluation, automatically-marked quizzes may not spring to mind, as evaluation is often done in prose. The case studies mentioned above include examples of higher-order thinking questions. This can be done through careful question construction with high-quality distractors, for testing, as shown here, or as a learning activity, asking students to apply skills and enter a rating at each stage as modelled by the Drop Bear activity in the Library Liaison team’s case study.
Following a request to create branching activities for the BMS Health and Safety Course, we have added an example of a branching activity to the FMS Community so that others can try these out. These activities can be used to present a scenario with a range of options for students to follow, like a choose-your-own-adventure book.
A branching activity was included in the Health and Safety course this year to guide students through a scenario where a fellow student becomes unwell. At each stage, some information and a set of choices is presented. The student clicks through to discover the consequences of their choices, and finally, an outcome is presented. Students can run through the activity multiple times to try out different paths through the scenario.
These activities are built by setting up pages in Canvas to represent each stage and adding buttons that link pages together in the right order depending on the choices.
You can try out an example branching activity in the FMS Community. This example has 13 different pages, including a landing page where students start the activity. The number of pages you need to create will depend on how complex you want your scenario to be.
This week I have been working on how to improve accessibility of resources, focusing particularly on the four commonest issues flagged by Ally in Canvas. I have been working on the BMS Health and Safety course to check its accessibility. I found that while it’s easy to add an image description in the Ally view within Canvas, I wasn’t familiar with how to correct issues within the PDF itself. After a few searches online, I was able to come up with a guide to help others fix these issues. A quick summary is below. You can access the full walkthrough on the FMS Community.
The four commonest issues I found were; a lack of image descriptions, a lack of headings, the lack of document title, PDFs not being tagged.
Find the Original Document
These can be added under image formatting tools in Word and PowerPoint.
Add or Define Headings
Make sure you are using the built-in style galleries and slide templates to format your document. This makes it easier for screen-readers to understand the structure of the information.
Add a Document Title
This setting lives on the ‘Info’ tab of a file – one that I had never paid attention to before!
Tag your PDF
After you have saved your file, you can also export it to PDF from the option on the same menu. Go to the advanced settings area and you can make sure that your PDF maker will include bookmarks and headings.
You can access the full walkthrough for each of these steps on the FMS Community. More information about Ally and accessibility is available via LTDS.
We have recently added a page to the FMS Community showing how you can add buttons to your pages. To add a button to your page, you just need to add a little snippet of HTML in the required place, and alter the specifications to suit what you’d like.
The button code is simple to edit following the instructions above, and buttons can be used for a range of purposes, such as navigating forward and back through a course, or links to external resources.
They come in a range of predefined colours, and are automatically formatted to look in keeping with the rest of your content.
Buttons can make your content more visually appealing, and can improve ease navigation through content. If you have a link that you want to stand out, try adding a button to your page!