As part of our Humanising the Online Experience webinar, we suggested the use of name selectors to take the decision-making out of selecting a student to answer a question. We recommend you use this only when you have gotten to know your students well enough to know how they respond to being asked questions by name. Using a randomiser tool can also reduce the feeling that the teacher is ‘picking on’ a particular student too often – both for the teacher and the students!
There are a lot of online tools available, such as:
Wheel of Names – a flashy web tool with animations and sound
The slight hitch with using these is that they are not reusable – you need to paste the names in every session.
It’s possible to create one of these yourself using Excel, which you can then save and re-use for the class time and again. A 2-minute tutorial for this, and an example file, is available on the FMS TEL Canvas Community. If you haven’t got access to that community in your Canvas yet, first enroll here.
Of course, you can use these tools for more than just selecting names. You could use this to randomly assign cases for students to study, or assign group roles. You can use them to generate lists of anything in a random order by noting outcomes.
During icebreaker games or other tasks, you may want to try a heads-or-tails or dice-roll randomiser, and there are many other randomising tools available on Random.org.
“A glossary is a great reference tool for a student, especially when they’re studying material which is quite technical and contains a vocabulary which is specific to the subject.”
David McGeeney, MCR8019 Module Leader
“Well, our students come from a diverse range of professional backgrounds, are based in different countries and have different experiences. And when you’re dealing with clinical scenarios you really can’t afford to allow confusion and misinterpretation to happen, especially where the subject material is quite technical. Adding a glossary to ONC8004: Developments in Diagnostic Imaging in Oncology allows us to focus the webpage content on teaching and learning whilst linking to explanatory terms for those who need it.”
Victoria Hewitt, ONC8004 Module Leader
Benefits of using a Glossary
Ensures all students are familiar with discipline specific vocabulary
Provides a reliable reference tool students can use throughout their studies
Content can be more concise
Easy to create
Can be rolled over year after year
Making your own Glossary
It could be as simple as having a dedicated page located near the start of the content which students can reference throughout the course.
You can view example glossaries in the FMS Community, along with instructions on how to add navigation options such as an A-Z menu at the top and ‘Back to top’ links.
The cross-university LTDS Flexible Learning 2020 course has information for everyone on copyright at this link. But there are some aspects likely to be more specific for FMS which are discussed here.
Copyright is the legal right of the creator of an original work to the exclusive rights for its’ use and distribution. It does not protect an idea though, just the expression of an idea whether they are in the form of a journal article, a book, an image, a video or any other media.
This means that you may not indiscriminately use any image or other media you find online.
Don’t run the risk of legal action; check provenance and obtain permission!
Creative Commons
When media are marked ‘Creative Commons’ or ‘CC’ this means that you are allowed to use the material with provisos according to licence type, whilst the creator retains the copyright of the material.
Creative Commons has a searchable database where you can look for materials which are legal to be used under CC licences; you can find it at this link. It covers YouTube, Wikimedia Commons and Flickr amongst others. Canvas has a searchable database of CC images, to access these select ‘Unsplash’ when you click the image icon in the text editor.
There are different types of licence which govern what you are allowed to do with the material, shown in this video:
Other free sources of images
There are several searchable databases where you can find images for use in courses. Some of these are detailed below, which may be of interest to bioscientists and medics.
Wellcome Images
The Wellcome Image library has thousands of images available under CC licences, from historical medical images through to electron micrographs. Their website is at this link.
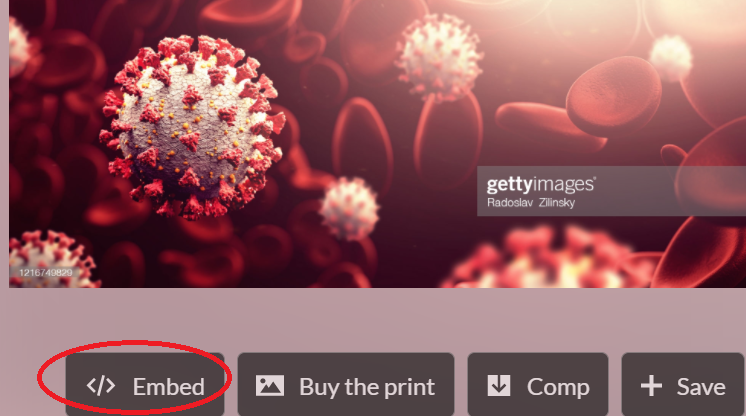
Getty Images
Some Getty Images are available for free via this link.
You will need an account, and you are only allowed to embed certain editorial images for non-commercial use; however there are still plenty to choose from! The embed option (</>) is present when you click on the image if you are allowed to use it; see red circle in image below:
Copy the embed code and paste into Canvas.
Images without an embed code must be paid for.
Radiopaedia
This provides a huge collection of X-rays which can be used for free, as well as articles and diagrams. The website is at this link.
Public domain
Some materials are in the public domain which means they can be freely used. It is polite to attribute these materials to their author.
Most images created by employees of the USA government are in the public domain, e.g. those from the National Institutes of Health.
Some materials are so old that the copyright has run out (more than 70 years). A good example of this is Gray’s Anatomy, available online at this link.
Rightslink
If you cannot find a free source you will need to obtain permission for use of images. This will sometimes require a budget.
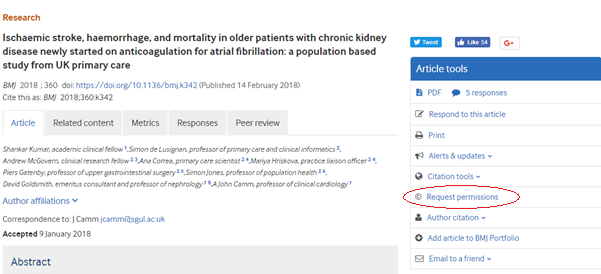
Journals which are not Open Access (most of these are Creative Commons, but do check because not all have their images as CC) often have a ‘request permissions’ button, as shown circled in red on the BMJ below.
This image is used with permission! (logged as 18797960 [ ref:_00D205YOi._500D01fS0ch:ref ] on 20.2.2018).
This will take you to a Rightslink login; you can create an account for free and this will allow you to say what you want to use the image for, and what type of institution we are: despite charging for courses we are a non-commercial institution. Complete the dropdown boxes, then find out from ‘Quick price’ whether the licence is free or not, and act according to your budget. Remember to print the licence or at least store the licence electronically as well as filing the email you will be sent as well.
The licence will tell you the wording to use beside the image. An example can be found here: NATURE PUBLISHING GROUP LICENSE
Other permissions
Other permissions may be harder to obtain due to lack of attribution. If created by a named academic they can generally be tracked down to their institution and if you email them permission is often readily given; hopefully we would be as obliging if the request was made to us.
As we have had a couple of enquiries via FMS Enquiries about audio and video, we have added some information to the FMS Community on how to edit using VLC Media Player. VLC media Player is a free application which allows you to play and convert videos. You can save in many different formats.
You may be looking to add new audio to an existing video, or remove audio before commencing adding a new narration. For example a demonstration of a practical session in a laboratory, or a tour around a building. You can also extract audio only from a video.
Animated GIFs are a great alternative to short videos or sets of screenshots. They can be used to display short moving images that can be looped to play repeatedly. The example GIF below takes the place of a series of screenshots demonstrating how to access a menu in Canvas.
Making your own GIFs
To make your own animated GIF, first record your screen as you perform the steps you want to illustrate. You can use Zoom for this, or any other screen-recording software you are comfortable with. Once you have your video, upload this to a video-to-GIF converter online. The best choice at the moment is ezgif – it has a wide range of features and good terms of use. They don’t store your file or claim any intellectual property rights over anything you upload, and your file is removed from the server in an hour. It’s always worth double-checking these online tools to make sure the terms are reasonable.
Using ezgif it is possible to crop the screen recording to show the specific part you are focusing on, and you can trim the clip to start and end where you need it to. Other settings include changing colours and setting how many times you want the animated GIF to loop.
Once you have created your animated GIF and have saved it, you can add it to a Canvas course in the same way as any other image.
The advantages of using GIFs
Compared with video, they minimise the storage space needed for the content, reducing data needed and loading times.
They can replace long sets of screenshots to show stages of a process. Often these screenshots take up a lot of space, and text can get lost amongst the large images.
They can be made quickly with no need for specialist skills or software.
Recently a change in Apple software made some other types of video and animation – those displayed in iframes – impossible to access using the Canvas app on iPhone. GIFs are a very accessible format and don’t require iframes to work, so using them where possible avoids this issue.
Some older formats of animations have become obsolete – animated GIFs have been around for over 25 years and show no signs of disappearing.
Uses for GIFs
To illustrate a couple of steps in using some software.
To show a series of improvements or changes to a document or file.
To show consequences of changing parameters in a simulation.
To illustrate the differences between a series of images, such as diagnostic scans.
We have had a few enquiries via FMS Enquiries about getting tasks done without specialist equipment we would normally have on hand in our offices.
We have recently added some information to the FMS Community on how to use mobile devices to produce learning materials. A kind of Do It Yourself guide for producing materials from home or on location.
Following a request to create branching activities for the BMS Health and Safety Course, we have added an example of a branching activity to the FMS Community so that others can try these out. These activities can be used to present a scenario with a range of options for students to follow, like a choose-your-own-adventure book.
A branching activity was included in the Health and Safety course this year to guide students through a scenario where a fellow student becomes unwell. At each stage, some information and a set of choices is presented. The student clicks through to discover the consequences of their choices, and finally, an outcome is presented. Students can run through the activity multiple times to try out different paths through the scenario.
These activities are built by setting up pages in Canvas to represent each stage and adding buttons that link pages together in the right order depending on the choices.
You can try out an example branching activity in the FMS Community. This example has 13 different pages, including a landing page where students start the activity. The number of pages you need to create will depend on how complex you want your scenario to be.
This week I have been working on how to improve accessibility of resources, focusing particularly on the four commonest issues flagged by Ally in Canvas. I have been working on the BMS Health and Safety course to check its accessibility. I found that while it’s easy to add an image description in the Ally view within Canvas, I wasn’t familiar with how to correct issues within the PDF itself. After a few searches online, I was able to come up with a guide to help others fix these issues. A quick summary is below. You can access the full walkthrough on the FMS Community.
The four commonest issues I found were; a lack of image descriptions, a lack of headings, the lack of document title, PDFs not being tagged.
Find the Original Document
These can be added under image formatting tools in Word and PowerPoint.
Add or Define Headings
Make sure you are using the built-in style galleries and slide templates to format your document. This makes it easier for screen-readers to understand the structure of the information.
Add a Document Title
This setting lives on the ‘Info’ tab of a file – one that I had never paid attention to before!
Tag your PDF
After you have saved your file, you can also export it to PDF from the option on the same menu. Go to the advanced settings area and you can make sure that your PDF maker will include bookmarks and headings.
You can access the full walkthrough for each of these steps on the FMS Community. More information about Ally and accessibility is available via LTDS.
We have recently added a page to the FMS Community showing how you can add buttons to your pages. To add a button to your page, you just need to add a little snippet of HTML in the required place, and alter the specifications to suit what you’d like.
The button code is simple to edit following the instructions above, and buttons can be used for a range of purposes, such as navigating forward and back through a course, or links to external resources.
They come in a range of predefined colours, and are automatically formatted to look in keeping with the rest of your content.
Buttons can make your content more visually appealing, and can improve ease navigation through content. If you have a link that you want to stand out, try adding a button to your page!


