Incorporating Pointing in Recorded Presentations – Motion tracking

This post shows how cursor movement can be used in online presentations to show gesture, and the skills needed to add motion tracked items to video.

As part of the recently launched Exploring 3D Anatomy MOOC, two video presentations were created. These presentations involved explaining diagrams and pictures. One of these recordings had a moving cursor which the presenter had used to explain various parts of the screen, and the other was recorded without a cursor. To improve the clarity of the explanations, we had a request to display a larger cursor over the recorded material, using it to ‘point’ to the various significant areas shown. 

When you’re planning a virtual presentation it’s worth checking if and how the software handles the cursor – some software will use a glowing highlight as you present, some will show and hide the cursor automatically depending on when you move it. The videos were recorded in ReCap, which automatically hides the cursor unless it is moving. The end of the post has links to various guides to help you choose your settings. The rest of this post details the animation process for how a larger cursor was added after the presentations had been recorded. This technique could be applied to other added graphical elements too if needed. 

Creating the New Cursor

As the cursor is used in a lot of animations, there was already a scalable vector graphic image of a cursor available to use. This had been drawn in Adobe Illustrator. The next step was to use After Effects to add the cursor to the video and animate it.  

Tracking the Cursor
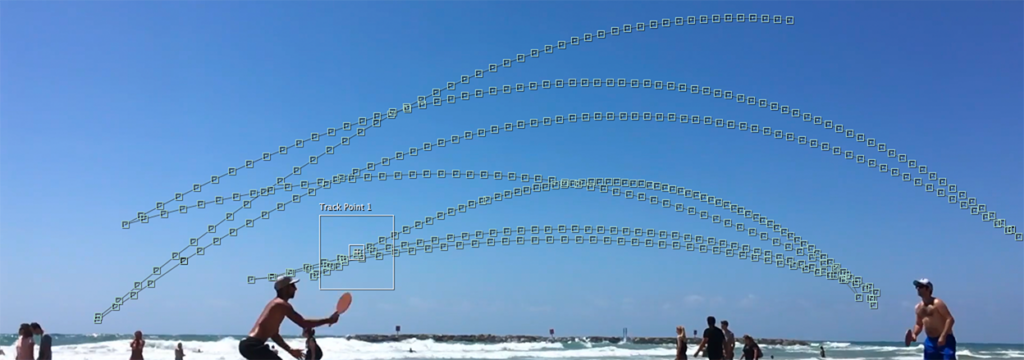
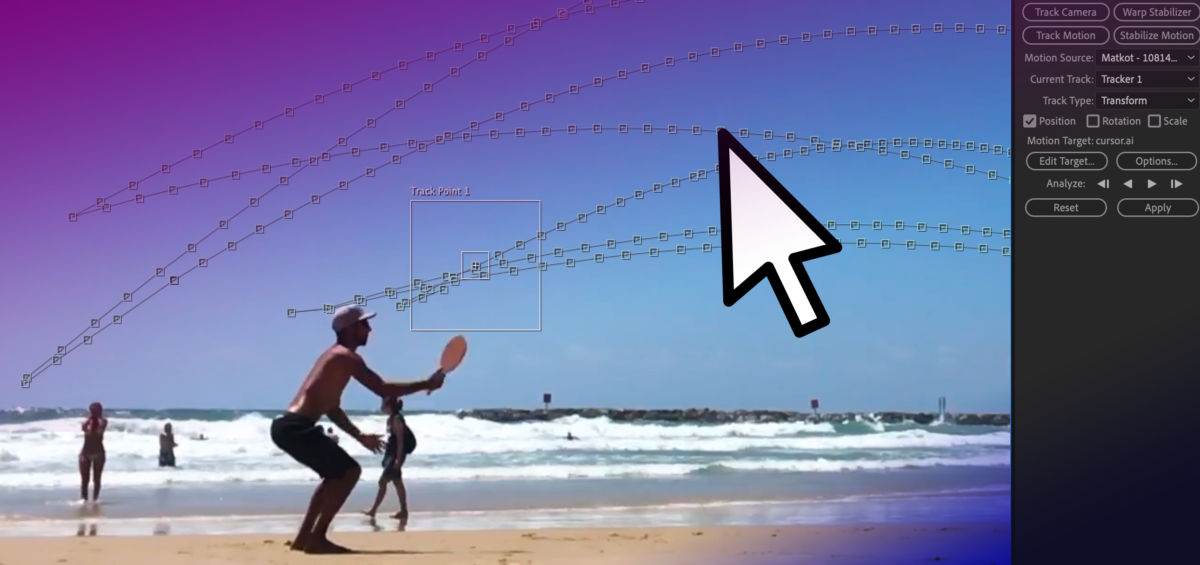
For the video with the cursor visible, the motion tracking function of After Effects was used. After identifying the original cursor, the new larger cursor was set to track it. Here and there the original cursor changed colour to remain visible over different backgrounds. It wasn’t necessary to replicate the colour change with the larger cursor, but this colour change did add extra steps when setting up the motion tracking as it needed to be started afresh each time the original cursor had changed colour. For the video without the cursor, the process was simpler as there was nothing to hide or track. As such the animations could be set up from scratch. Based on the clear explanation from the presenter, it was possible to add a cursor to trace the areas being explained.  

Adding the New Cursor

The animations were set up to take place between certain moments of the video – like scenes. Key points in the video were identified and ‘key frames’ added which allow us to set up when certain animations should take place, and how long for. Simple animations such as changing size, position or rotation can be done relatively quickly using these linear key frames. 

Once the start and end points are set, further customisation can be done to change the feel of the animation. For example, in this case, the speed of the cursor should somewhat mimic a natural movement rather than a precisely uniform speed. Using ‘ease in’ and ‘ease out’ (combined as ‘easy ease’) allows for the animation to look a little more natural, and less jarring, as the cursor starts to move more slowly before speeding up and gradually slowing to a stop.  

When moving from point to point it’s very rare that a straight line is the best path to take, usually a slightly curved path can help add a more natural-looking movement. This might be used to instruct a viewer to click a series of buttons, for example. The ‘spatial interpolation’ in After Effects allows for the path of the moving object to be linear (a straight line) or Bezier (curved). The temporal interpolation tool allows for variations to the speed of the movement – a more customisable version of easing. Adjusting these allows for a nice natural pace and movement, and for more creative effects. For example an item moving from A to B may move slowly at first, then speed up towards the middle of its journey, then slow down again before arriving at its final destination – imagine a train travelling between stations!).

In this video the cursor was hidden from screen for most of the video so it was animated manually.
In this video the cursor was tracked (while visible), note the more erratic movement.

Approximating Gesture

The final videos allowed for a clear approximation of gesture to be added to the presentations, mimicking how a presenter might usually point to a screen or demonstrate a movement. While this is something very natural to do in person, you may need to think more about how you use and move your cursor in online presenting. Often it can be tricky to see the cursor, so you may wish to consider moving it more slowly than usual if you are using it to indicate processes or changes. Selecting some form of pointer or cursor highlighting in your chosen software can improve the visibility of the cursor during your presentation, whether recording or in person. On the other hand, you may wish to put your mouse out of reach so that random or accidental cursor movements don’t detract from your content. 

Motion Tracking Demonstration

This video demonstrates the full motion tracking procedure, showing how you can track an object and then map the position of a cursor to it.

Resources

I’ve got too much email!

This resource provides you with tips and tools for managing your email. Includes instructions and anecdotes on email management.

The FMS TEL team have developed a short course showing how you can make Outlook work for you. If your inbox is a chore and not a help, why not take a couple of minutes to tame the beast?

The short course is available on Canvas (also available in the MLE), and comes with an accompanying 9-minute audio programme which talks you through some examples of what the tools can be used to achieve.

The course is also available for you to import into your own courses via Canvas Commons, so feel free to use it!

But I haven’t got time!

  • 10 minutes – listen to the programme for food for thought, or do a quick spring clean
  • 20 minutes – click through the guides and listen to the programme, try some things out
  • 1 hour – give your inbox a good spring clean using our tips and guides, and implement some rules and filters to organise your incoming email
Feel your inbox stress just melt away

6 Steps to Spring Clean your Inbox

  • Look at what you’re receiving and who and where it is coming from.
  • Decide what is important or necessary, and what is less so
  • Unsubscribe from unimportant or useless notifications or services. Adjust your email notification settings in Teams and Canvas to reflect what you really want to be emailed about.
  • Try out categorising emails from certain people, projects or services.
  • Use folders or search folders to move things out of your main inbox using rules based on email features like the sender, or categories you set.
  • Review regularly and change your system to suit what fits your needs – if a folder or rule no longer serves you, change or delete it.

Resources

Cropping Video: Removing the date from Screencasts

Over the last year or so most of us will have taken the plunge and recorded a lecture or tutorial to share with students. You may be considering reusing this content for years to come, however the date and time on your screencast will give the game away.

I don’t know if some students would have a problem with a video from last year being used again this year… I would prefer the date (which is visible at the bottom left of my laptop screen) to not be visible

FMS Module Leader

We can do this with video editing software such as Adobe Premier Pro or Final Cut Pro, but what if you do not have access to such software?

At this point most of us usually head to Google to find a free alternative. Trying to find a free online tool can be a little daunting and it’s always worth double-checking the usage terms and privacy policies are reasonable.

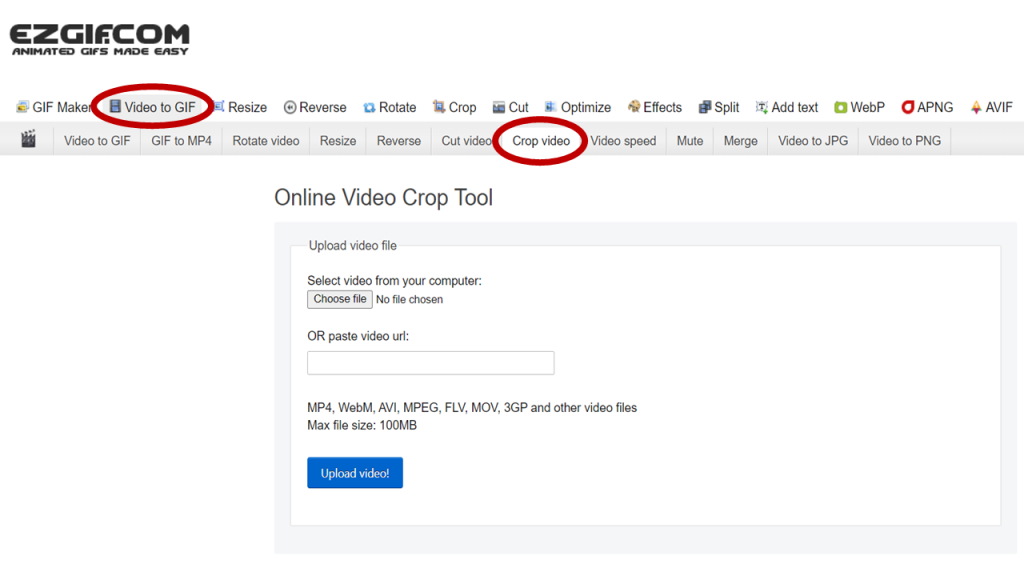
We have previously recommended ezgif.com to be used to create animated gifs for instruction and demonstrations. Ezgif don’t store your files or claim any intellectual property rights over anything you upload, and your file is removed from their servers in an hour.

This free content editing website can be used for so much more than just creating gifs. They have a designated area for editing videos, including an easy to use cropping tool.

Digital Image File Formats, and When to Use them

Are you confident that you know when you should use a specific type of image format?

Within FMS teaching and research there is a great demand for clear and detailed images – this could be for purposes such as sharing diagnostic images or microscope views in high clarity, photographs of real cases and examples, or designing something eye-catching to promote your initiative. The detailed guide below explains the types of image formats you may find useful for different purposes.

There are several image formats that you are likely to come across, but what you may not know is that they can be separated into two ‘families’. This guide will help you understand the characteristics of each format, and which situation lends itself best to each.

Before we go into the details of each specific format, let’s talk about the two key families. These are VECTOR images and RASTER images, and while at certain sizes they could look almost exactly the same, their construction is fundamentally different.

Vector Images

Vector graphics are based on mathematical formulas that define geometric shapes such as polygons, lines, curves, circles and rectangles. Because vector graphics are composed of geometric constructions, they are best used to represent more structured images such as icons, line-art graphics and illustrations with flat uniform colours.

File extensions EPS, AI and SVG are examples of this type and are perfect for creating graphics that require frequent resizing such as logos and icons.

Vector-based images are much more versatile than raster-based images, with their most obvious advantage being that vector images are infinitely scalable. This means that the same image could be printed out the with the same clarity at both advertising billboard and postage stamp size. Another advantage is that as they are images that you create from scratch (as opposed to photographic images) they have a transparent background to them by default. If you need a white or coloured background in your file you can simply add a coloured box under your artwork.

Vectors do have a few limitations, such as not handling effects such as blurs, and poor handling of gradients.

Raster Images

Also known as Bitmap images, Raster images are composed of individually coloured square pixels which build up the complete image. As an example – all photographic images are captured as raster images, with TIF, JPGPNG, and GIF all being examples of raster image file extensions.

Pixels have a defined proportion based on their resolution (high or low), and when the pixels are stretched to fill space they were not originally intended to fit, they become distorted, resulting in blurry or unclear images. When you resize raster images by scaling up you will be compromising their resolution, as a result, it is important to remember to save raster files at your required dimensions. Once you make a source image smaller than its original size there is no going back – unlike vector images!

This example demonstrates the different affects that scaling has on both a vector and raster image (logo). Notice how they both look fine at first, but then pixelation occurs.
A note about ‘Resolution’ and ‘Effective Resolution’

Image resolution for raster images is measured in DPI (dots per inch) and this refers to the density of pixels in an image. Websites display images at 72dpi which is a relatively low resolution. By contrast, images that will be used for printing are required to be no less than 300dpi at the size they will be printed.

You can’t just take an image and scale it up dramatically, as it would stretch out and lose quality, as the dots per inch would effectively have been lowered, i.e. the ‘effective resolution’ would be lower.

What is compression and why does it matter?

When you save an image, some files need to be ‘compressed’ to keep file sizes down, as the files themselves would be far too large if this didn’t happen. Some formats are ‘lossy’ and some are ‘lossless’. If image compression is lossy, this means that every time you make an amendment and save, you may lose some quality, sharpness or colour data. The quality of the image decreases in proportion to file size.

Here are details of some of the most common file types you’re likely to encounter:

Raster File Formats

1. JPEG – Joint Photographic Experts Group

JPEGs are an extremely common image file type and as a result they can be used both on websites and in most desktop applications. It is a lossy file format.

Your file may have either the .JPG or the .JPEG extension, don’t worry it’s exactly the same type of file, and the .JPG extension is the most commonly used.

Note: This type of image does not support an alpha channel, therefore can’t have a transparent background.


2. TIF (or TIFF) – Tagged Image File

Mainly used in the print industry, these files tend to be very large high-quality photographic images that feature “lossless compression” meaning the original image data is maintained regardless of how often you might copy, re-save, or compress the original file.

If you have access to Adobe Photoshop, then you have the ability to retain a layering structure within the file. This means that if you put a text layer at the top, you could then move that text around without being destructive to the layer below. The same is true for a native Photoshop file.

Note: Due to the low compression and high file sizes, this type of image should not be used online as it will take forever to load!


3. PNG – Portable Network Graphics

PNG’s are probably the second most common image type after JPGs. They offer lossless compression, so don’t lose quality when resaving or editing, resulting in a sharper image.

If you are preparing an image for a website then this format will probably be your best option as it allows for everything a JPG does but with a much sharper image. It can also handle transparency, enabling the use of a transparent background which is great for placing logos on to images, for example. These are not suitable for professional print purposes though, and are usually of a lower resolution for use online.

When saving these images in Photoshop you can choose between an 8 Bit, 16 Bit, or 32 Bit colour palette however this will be reflected in file size.


4. GIF – Graphics Interchange Format

There was a time when these and JPGs were pretty much the only image formats that you needed to know about however times have changed.

In their standard form GIFs are a pixelated image made up of a colour palette of up to 256 colours. Due to the limited number of colours, the file size is drastically reduced.

An example where these may be used could be some navigational icons on a site or app that require a quick load time.

The rise of social medial has contributed to the use of Animated GIFs, which are essentially a series of frames embedded within the GIF file. This can give an almost video like impression and typically only last a few seconds.


Vector File Formats

5. EPS – Encapsulated Postscript

An EPS file is a vector format that has been designed to produce high-resolution graphics for print. Almost any kind of design software can create/open an EPS.

The EPS extension is a universal file type that can be used to open vector-based artwork in almost any design editor, not just the more common Adobe products.

This safeguards file transfers to designers that may be using different software.


6. SVG – Scalable Vector Graphics

Although all vector graphics are scalable, the SVG file type is specifically named Scalable Vector Graphics because this format can be easily used online with newer technology and higher screen resolutions being introduced.

An SVG file would ensure that the quality of the image is not compromised no matter what device it is viewed on. This could be particularly appropriate for a logo or statistical chart. However, this image format is not intended for professional print purposes.

Note: SVGs can also be used in SVG animations.


7. AI – Adobe Illustrator Document

Adobe Illustrator is used for creating and editing images, rather than for sharing or uploading. Adobe Illustrator documents are the preferred vector graphics format used by designers for creating images for use in all types of projects from web to print.

Adobe Illustrator is the industry standard for creating vector artwork from scratch. It can also be used to export to pretty much any other file type.

Note: Think of these as being the “Source” file. Access to Adobe Creative Cloud is required to open this type of file.


It can be pretty complicated to fully understand the different image characteristics, much more so than it seems at first glance, but this brief guide has provided a better understanding of the standard file types and which are most appropriate for your project.

Conclusion

  • PNGs are very useful for most purposes – they are not lossy, and you can have a transparent background for easy integration to any document.
  • GIFs can be animated, and can also handle transparency.
  • Resolution is only relevant to raster images.
  • Vector images can be scaled up and down infinitely without loss of quality, which is great for logos, graphs and charts.

Basic Image Editing in Microsoft Photos

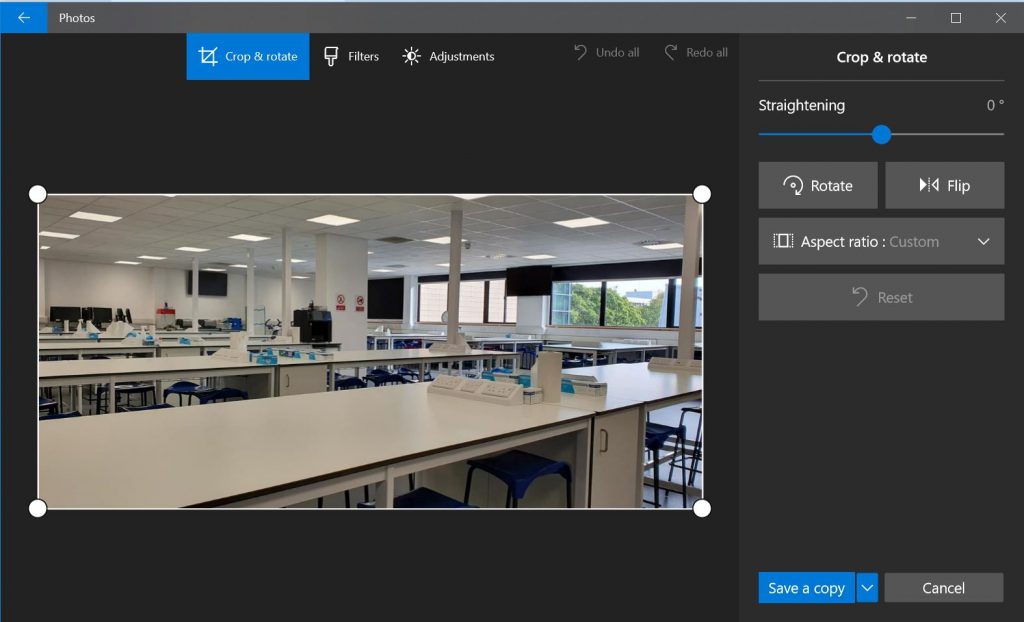
You may not have expensive software like Photoshop for image editing or you may just want to do a quick edit. There is a free option for basic editing in Windows 10. It’s called Photos.

If you’d like to find out how to do basic editing in Photos then check out this guide on the FMS TEL Community:

Canvas https://ncl.instructure.com/courses/30988/pages/basic-image-editing-in-microsoft-photos

MLE https://mle.ncl.ac.uk/cases/page/30511/

Setting up different types of Discussions

The FMS TEL team recently delivered a webinar: Getting the most out of your discussion boards. If you can’t access the FMS TEL Canvas community, please enrol yourself before retrying the direct link.

As a follow up to that webinar we have created follow along video guides and step by step written instructions on how to make the ideas and suggestions a reality. Our guides cover:


Voting and Polls ✅

These can be set up in around 2 minutes and no external tools are required. Students can quickly share their opinions or provide feedback in a similar format to Social Media.

Discussion Folders ?

Is your modules area looking cluttered? Organise your discussions into folders so they are easy to navigate.

Sharing Group Discussions ?‍?‍?‍?

Group discussions in Canvas can be a great option however they have the disadvantage of only group members being able to see what was contributed. If your course would benefit from groups being able to share with other groups after the task then we have 2 solutions for you.

Multiple Posting Points ??

Some courses may require students to share personal experiences. In this guidance we offer a solution for student to choose if they post to the whole cohort or just to the Teachers on the course.

Anonymous Posts ft. Padlet ❔

Currently Canvas does not allow anonymous posts. To get around this limitation we can create boards using an External Tool Padlet and embed Anonymous Padlet Boards within Canvas and the MLE.


Humanising the Online Experience – Guide

A new guide has been created in the Humanising the Online Experience area on the FMS TEL Canvas Community, and can be accessed directly. You can download this document to keep a summary of the webinar tips handy, or read it below. If you can’t access the FMS TEL Canvas community, please enrol yourself before retrying the direct link.

Humanising the Online Experience

This document summarises the tips from the FMS TEL Humanising the Online Experience webinar. The full set of resources can be found on the FMS Community, including rationale, research, and links to resources. This should be read in conjunction with the University guidance and the guidance available within your school. Not all tips will be useful for all situation or all students – you know your students and can select appropriate strategies.

Objectives

  • know how to set expectations and maintain these
  • have strategies to make synchronous sessions more like PiP interaction  
  • have strategies to be more present in non-synchronous aspects of a course  

Summary

  • Humanise your teaching by being compassionate to your students and yourself.
  • Set clear and reasonable expectations, and be predictable.
  • Know your student (‘s names)!
  • Ensure student contributions are easy to make and clearly valued.
  • Be authentic rather than perfect – acknowledge the awkwardness and tech troubles.
  • Create opportunities for regular quality authentic interactions with students.
  • Appreciate the strength of video and live interaction in terms of richness of interaction, while noting that this makes it more intense to participate in.
  • Recognise the benefits of non-synchronous activities in reducing pace and intensity, allowing for more reflection and considered responses, and bridging time zones.

Expectations

Learning online is a change of culture and this needs to be recognised. Students and staff are still negotiating how the classroom works in an online context and sometimes there is a misalignment between staff and student expectations.

Expectations and Assumptions

Remember that your session may not be the only session that students are attending that day. Acknowledge the challenges of the online way of working and work with students to adapt to these. Consider:

  • A poll or survey to check what is going on with students.
  • Reach out to learners who are not engaged or are not progressing.
  • Discuss how to adapt to the online environment.
  • Draft a Group Learning Agreement together and share your expectations clearly.

Make it easy for students to access your session by being predictable. Repeat similar task/session structures and activities to cut down on instruction time.

Maintaining Expectations

Consider using a holding slide at the start of each session with session expectations on it. Repeating these helps remind students of the required standards. Include/be mindful of caveats. For example, instead of ‘Students must have cameras on at all times’ try ‘Students should keep cameras on where possible’. Encourage through gentle nudges – thanking students for complying rather than taking an ‘enforcer’ stance. Lead by example wherever possible.

Synchronous Strategies

Camera Off

You can use these camera breaks for any type of task, such as considering an answer to a question or looking at a new resource and responding. Make sure that you use clear start and end points, stay silent for some time yourself, and warn students before feedback or further input starts. If students don’t have to worry about how they appear on the camera, they can more effectively concentrate on the task. Camera-off time allows for moments away from the emotional stress of being ‘under scrutiny’, and it eases screen fatigue if the student has had other classes prior to yours.

Explain that camera-off time will be included in your session introduction and expectations. This mitigates the problem of people thinking they need to choose on or off at the beginning of the session and then stick to it, making ‘camera on’ a much less intimidating choice and allowing an easy way in for shy students.

Hide Self View

If you find your own image distracting, click on your image in Zoom and choose ‘hide self’. Note students do need to be warned that this doesn’t hide others from seeing them! This feature is not yet available in Teams, but you can always stick a post-it on your screen!

Chat

Asking students to drop their responses in the chat box allows shy students to participate more easily and allows those who prefer to learn through discussion to do that without taking over the session. Students can go back and review the chat if it is saved for them too. This is quicker than setting up a shared document.

Authenticity

Acknowledge the awkwardness of video teaching and that you understand their awkwardness too – we’re all in it together and may need to push out of comfort zones. Be animated and show your personality/humour a little – it’s OK to smile or make jokes. People always come across ‘flatter’ on screen than in person, so the extra effort is worth it. Admit if things are a little tricky or go wrong and take a moment to fix them before moving on smoothly. Suggest a five-minute break if the whole session has been halted for tech reasons so that you can fix the problem and regroup your thoughts. Have a question or little task for students in your back pocket in case of difficulties.

Icebreaking

Icebreakers almost always feel contrived but still work – acknowledge this and be encouraging as you try these activities out. Try these in small groups in breakout rooms first. You will likely need to visit the rooms and push the energy levels up initially. Whole group icebreakers can include things like asking everyone to send a reaction emoji or give you a thumbs up/down on camera in response to questions.

Wait Time

Teachers are often guilty of not waiting long enough for an answer – usually overestimating the time they have waited. This wait time feels worse in the online environment. You need to wait longer than normal online because it takes time for students to type a response or switch on their microphones. Give a long wait time for your questions and use a timer (either on screen or silently on your phone/another screen) to make sure you are giving students enough time to respond. Lengthen your wait time if students haven’t responded, and state that you are giving them more time.

Acknowledge Individuals

Start the room early and greet students as they arrive in the room – a simple hello and using the students’ names is a lovely start! Ask students to set profile pictures on Zoom (not necessarily of themselves) to help differentiate them visually if they don’t put their cameras on. This makes them more memorable individually than a sea of names in text. Explain why you are doing this. Make effort to learn and use students’ names as you would in PiP. That doesn’t necessarily mean picking on students for questions, it can be thanking them for contributions and greeting them too. Suggest students do a video/audio introduction either privately or in a shared discussion space.

Have we started? Are we done?

Normally this is done non-verbally or with body language like standing up and coming to the front or packing away notes. Clearly announce the start and end of the class time. Consider leaving the room open for a little while after class for less formal chat.

Breakout Room Strategies

Set expectations: What do they need to achieve? By when? When will you check in with them? Warn students if/how you will do this and be consistent.

Use monitoring strategies as in PiP. Visit each breakout room quickly at the start to check everything is understood, say when you will visit again and follow up. You do not always have to contribute ‘in person’ by dropping into the room – you can also drop comments and annotations on the page. Some tasks can be monitored by a Sharepoint folder in tile view to watch multiple documents being updated simultaneously. You can’t read text, but you can set up documents with visually distinctive features such as empty boxes to be filled, or items to be sorted/moved around on the page. You can also monitor web tools and documents for each group by opening each group’s document or page in a new tab in your browser and clicking between, or even tiling them in separate windows if you have enough screen space.

Non-Synchronous Strategies

In addition to the above strategies, some of which apply in a non-synchronous setting, the tips below are unique to the non-synchronous environment.

Presence

Maintain an online presence by regularly participating in discussions and giving feedback. Show students that their discussion board posts etc. are being read by someone. This doesn’t mean always being available; it just means setting aside some time to connect. Consider running an ‘office hour’ drop-in via Teams, Zoom, or Canvas chat.

Text-based interactions

Bear in mind that tone is more difficult to convey in writing than in person. Supplement your text with emojis where appropriate or if you think there is a chance of misinterpretation. If a message seems impolite consider differences in culture and language usage – English has a tendency to be full of pleases and thank yous in a way that other languages aren’t.

Scheduling, planning, linking

Ensure that non-synchronous tasks are part of the flow of learning and that the knowledge gained is referred to in synchronous sessions. Create clear learning objectives with completion linked to synchronous events or certain dates, and make sure you feed back on them. This gives the learning more value. Set time aside to clear up issues arising from non-synchronous teaching if needed.

3D Object Photography

3D object photography can have many purposes from selling products to interactive learning. It can be a complicated process, but we recently found a way to do it at home or in the office.

The thinking behind this for FMS is for the ability to show things such as models of parts of the body for example, which students away from the lab won’t have access to. They can interact with the object, and look 360 degrees around it. You can use a host such as Sirv (Links to an external site.) to create an interactive object.

Below is an example of what can be created. It can be viewed in full screen from the Sirv website:  https://tracyncl3d.sirv.com/Head/Head.spin (Links to an external site.) 

Would you like to try it yourself? You can find a guide on this in the FMS TEL Community

https://ncl.instructure.com/courses/30988/pages/3d-object-photography-at-home

Using Canvas Commons

Michelle Miller shares her learning about Canvas Commons, which she has been using to share FMS digital skills content across multiple courses in Canvas.

Canvas Commons

Canvas Commons is a repository where Canvas course creators can upload all or part of their course for easy access and sharing within their organisation or to the Canvas public. You can use Canvas Commons to store your content (for your eyes and access only) or for wider use. It is an easy way to access and import Canvas content to multiple courses. This post will walk you through the steps of publishing part of your course in Canvas Commons.

Sharing to Canvas Commons

Begin by identifying the module, assignment, quiz, page, or other module content you want to share in Commons. In this explanation we will discuss sharing a module, but the same steps can be used for sharing a part of a module like an assignment, page, or quiz.

In the module title, select the three vertical dots and choose Share to Commons.

You’ll now be taken to the Commons uploading page where you will select settings for your Commons item.

Sharing and License:

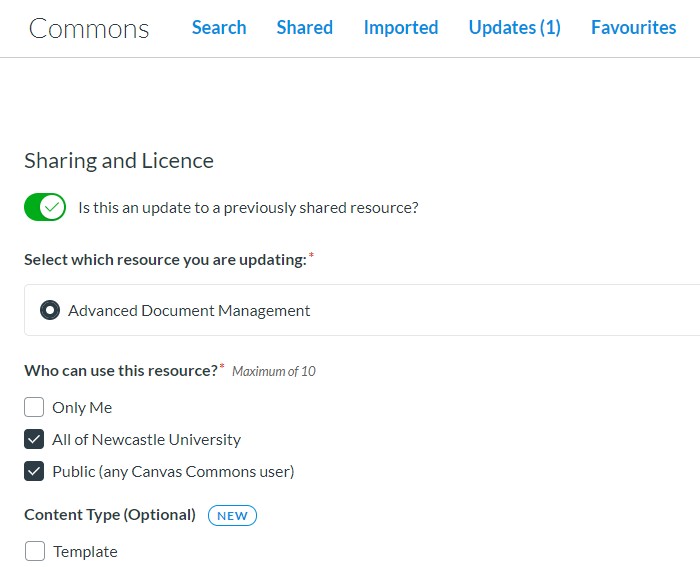
                Toggle – Is this an update to a previous shared resource? This tool allows you to make updates to items you have already shared in Commons. These updates are pushed out to anyone who has imported your Commons content, thus allowing you to make changes and updates to content globally.

                Who can use this resource? – You can choose ‘Only Me’ for content you want to be able to import into future courses, but do not want others to have access to. Or, you can choose All of Newcastle University to give access to anyone at the university, or Public to give access to any Canvas User.

                Content Type – This allows you to mark the content specifically as a template or open textbook. This is optional.

                License – Choose the level of license you wish to apply to the content. This is especially important to consider when making the content Public.

                Add Additional Information – This is where you can enter the details for attribution, such as the author to credit and date of publication/copyright.

Metadata:

                Title – Give the item(s) a short but descriptive title that would help others locate and understand its content.

                Description – Provide a detailed description of the content. This should help others understand what is covered by the content.

                Tags – These optional items allow you to tag specific words or phrases that help identify and describe the content to improve search recall.

                Image – Choose an image to display on the Commons card for your content. You can upload your own image or choose one from the Canvas photo library.

Grades:

                Grade/Level – Use the slider to mark the appropriate grade level for your Commons content. This can span multiple grades, e.g. Undergraduate and Graduate.

Press the Share button when you have completed all the settings for your Commons content. You will now find your content under the Share tab in Canvas Commons. Remember, you can make changes to your Commons content and push updates in the future. You will be asked to enter version comments when doing this. It is recommended you note the date the update is processed.

Importing Canvas Commons Material

Importing Canvas Commons material is easy to do. Simply go to the Home page of your course and choose Import from Commons button on the right side of the screen. Search for the item by title, name, institution, or tag. Select the correct item then choose the Import/Download button on the right side of the screen.

Select the course or courses you want to import the content into and choose Import into Course. You will receive a message saying the content has successfully imported.

The content will now be shown in the relevant page in Canvas, e.g. a module import will be shown on the Modules page. You can then choose to edit the module, assignment, quiz, or page as you normally would in Canvas. Imported assignments will be shown at the bottom of the assignments page under “Imported Assignments”. You can make changes to content as you would edit your normal Canvas content.

Summary

Sharing to Canvas Commons is an easy and effective way to make your course content available to yourself in other courses, others within the university, or with the wider Canvas public. It allows you to access not only your own material, but material created by others that you might find useful for your course. It also allows you to showcase your material to the Canvas public.

ReCap – Adding an Audio file to a Video

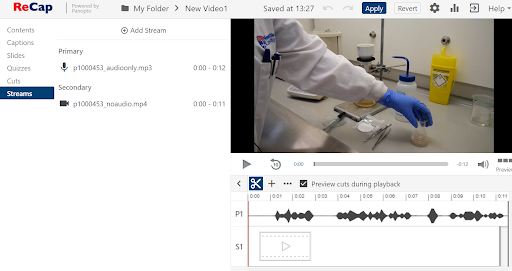
Resulting from a few queries from FMS staff, we have added some information to the FMS TEL Community detailing how to add audio to a video using ReCap.

Staff had recorded footage of processes or experiments in laboratories which they wished to add a narration over afterwards. There was existing audio or noise on the video which they did not want to include. Rather than go through the process of removing the unwanted audio, ReCap/Panopto ignores the audio if the video is uploaded as a Secondary file. Audio can only be uploaded as a Primary file.

You may want to record your audio narration first using your mobile phone or software such as Audacity on a computer with a microphone. A common format would be mp3. Then upload your audio narration as your primary file and your video as a secondary file. Any audio in your video file is ignored and the new audio you recorded will be played instead.

See the full guide ‘Adding an Audio file to a Video‘ on the FMS TEL Community course in Canvas.